Recently, I received a panicked email from my step-mom wondering why a page break could not be removed from Microsoft Word. Normally, if you click on the “show paragraphs” button (¶), you can see a page break or section break. However, in this case, there was no line signifying a section break or page break when the formatting was revealed. However, there was a little black square right near paragraph that I believed to be causing the issue. But removing that formatting is not the most intuitive. Eventually I figured it out though.
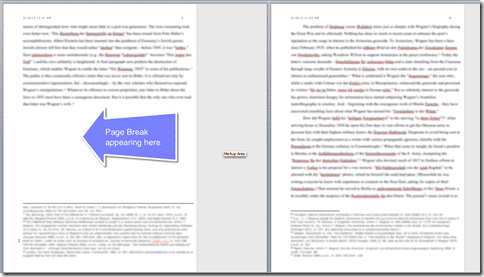
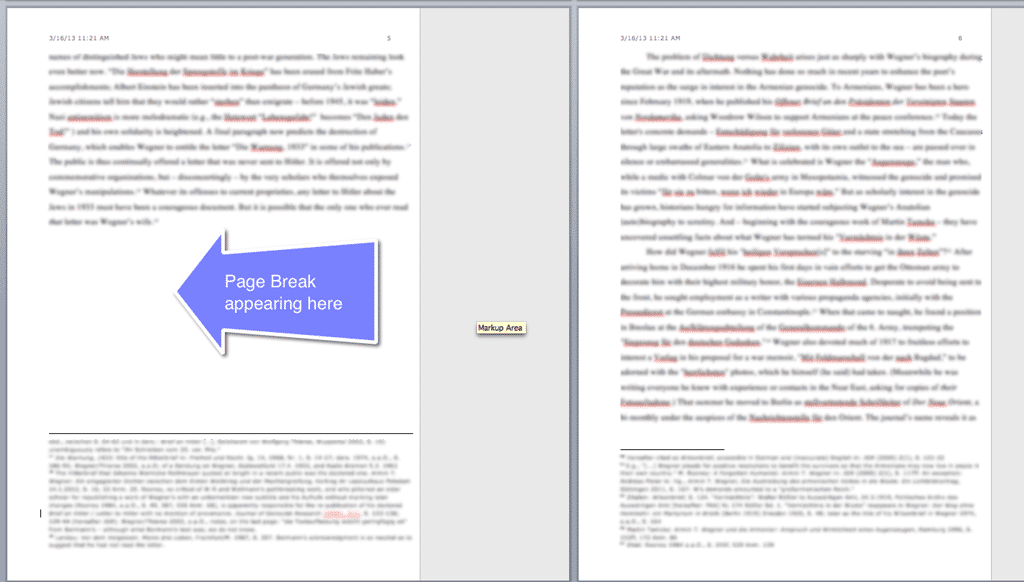
Above you can see the page having the issue. There was a page break occurring but when revealing the formatting, all that you could see what a little black square on the paragraph after. But to correct the issue, the steps are relatively easy. Here’s what you do.
How to Remove Little Black Square Paragraph Formatting
Microsoft Word allows you to set up all sorts of formatting of your text, paragraphs, sections and document. But sometimes it’s not as intuitive as you might think to do things. Here’s how you can remove those pesky section or page breaks that aren’t immediately obvious.
Display Paragraph Marks
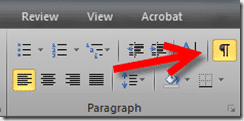
First, you need to enable the show paragraph marks and other hidden formatting. You can do this by clicking on the ¶ button. Microsoft Word for Mac is shown below.

This is what it looks like on Word for Windows.
Show Non-Printing Characters & all Formatting Marks
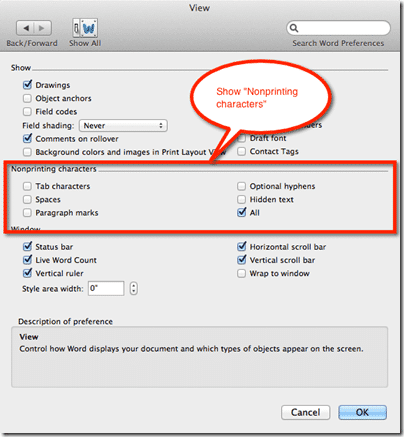
To ensure that you really are seeing all of the mark-up icons in your document, it’s helpful to enable the “Nonprinting characters” as well. Below is the Mac version. To do this on the Mac, go to Word Preferences > View. Note that I enabled “All” so that I can see all types of hidden, non-printing characters.
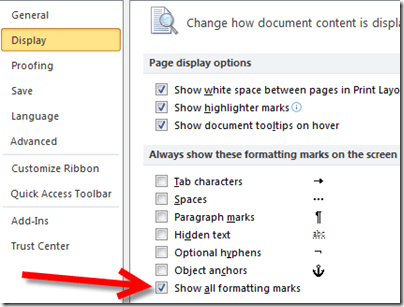
On Word for Windows, it looks similar. You can access it by going to File > Options > Display and check off “Show all formatting marks.”
Once you have that enabled, you should go to the paragraph in question.
Analyze the Paragraph Formatting
Once you know where the issue is, you should look at the hidden formatting of that paragraph and the one immediately following it. In my example, I noticed that the following paragraph had a “little black square” to the left of the paragraph. And, no matter what I tried to do, I could not delete it. (Normally, you can delete page breaks or section breaks by just highlighting them or putting the cursor right after it and deleting it. Not in this case though.
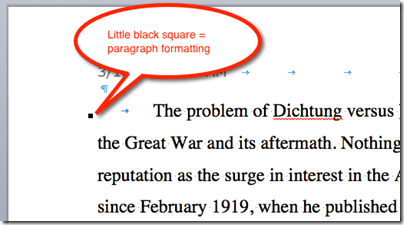
According to Microsoft, the little black square signifies that there is paragraph formatting applied to that paragraph. To remove the break, you will need to see what formatting is applied to that paragraph.
Removing the Paragraph Formatting
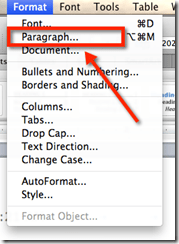
Here’s how you remove the paragraph formatting. First, on the Mac, position your cursor in the paragraph that has the little black square. Then go to Format > Paragraph from the menu.
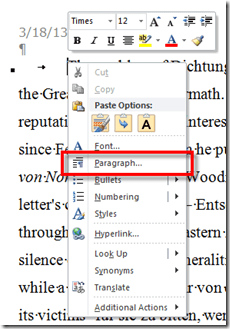
On Windows, the easiest way to get to the paragraph formatting is to Right-Click on the paragraph and choose “Paragraph” from the window.
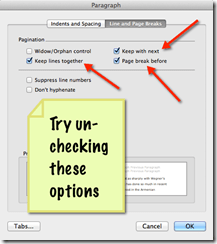
From the box that opens up, go to the “Line and Page Breaks” tab. You should try unchecking the following items (Mac version shown below):
- Page break before
- Keep with next
- Keep lines together
On Windows, you should also go to the “Line and Page Breaks” tab and uncheck the items mentioned above:
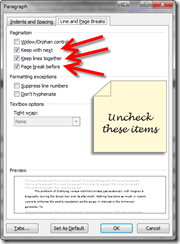
Once you uncheck those items, your page break should (hopefully) be removed. The little black square should also magically disappear.
Hopefully this little trick has saved you time and your forehead from being pounded against the keyboard. While it’s a simple fix, it is not immediately apparent or obvious on how to do it. Please leave a comment if this worked for you, or if you have any other software questions that are particularly bugging you, leave a comment as well.
HTD says: Microsoft Word is a powerful text editor, just don’t let that formatting get in your way!


79 comments
Peter Pollak
Many, many thanks.
I worked for hours to get read of these pesky little squares.
[email protected]
Thanks! Amazing
Tom
Add me to the list of people who so appreciate this assistance.
Lizzy
Thank you – never seen this icon before in formatting and was starting to get quite irrate!
Jenn
Wow…just saved me a headache I have been dealing with for days. Glad I finally decided to look. Thank you!!!
Michael Sheehan
Hey Jenn – so glad that it worked for you and thanks for the note.
Diana La Guardia
Thank you for explain this so well. Unfortunately it didn’t work for me. The black box is at the beginning of a footnote, before the subscript number.
Can you suggest something?
Michael Sheehan
Hi Diana – unfortunately, without seeing the document in question, it is really hard to know. It is probably related, but the process for deleting or selecting the area of the issue might be a bit trickier, especially when it comes to footnotes.
mehri
you saved me….thank u :)
Laurice
I wish I could find you and personally hug and kiss you!!!!!!! For all the years I’ve worked in Word, I’ve never heard of a Paragraph Page Break. Ugh!!! It was driving me crazy. THANK YOU, THANK YOU, THANK YOU. I can’t thank you enough! God bless you!!! <3
Karen
Here we are, nearly 9 years after your original post and its still relevant and it still works! Thank you so much! I tried Word “help” function and couldn’t find anything. There was a short period of banging head against table. Your fix worked perfectly. Will be bookmarking this solution.
Narinder Jessy
Wonderful, worked. Learnt something new! Thanks so much.
Julian
Great stuff! Worked a charm still on Word for Mac 2021.
Mike
Thanks. This was driving me crazy.
Sherrie A Cook
Thank you so much. Got rid of my unexplained white space at bottom of pages. I wonder if it would be safe to ‘Select All,’ and get ride of all those awkward little black boxes, without unknowingly screwing up something else.
Warren
Yes, your instructions removed the little black box. However, it changed the font to Italic, the Bold to Regular, and the Regular to Bold. So, I have to redo the whole paragraph.
Jonathan Birchall
Thanks. I was losing my mind.
E
thank you
Janice
Hello Michael,
I do have a formatting issue that is driving me crazy ! After transferring several boxes from a Word document to a Word template, I’ve noticed that each part of the box with a different style has separated from the rest of the box, and I can’t seem to figure this out, even after removing the little black squares that you mention. I could send you a screenshot if you think you might have an answer.
thank you,
Janice
Avner
The text above says “On Windows, the easiest way to get to the paragraph formatting is to Right-Click on the paragraph and choose ’Paragraph’ from the window.” In fact, what opens when you right-click on the paragraph is not a window but a menu. Thanks.
Roger Bissell
Easy-peasy. Thanks for the great tip! :-)
Elizabeth Corsie
Followed your instructions for Word for Mac – they worked perfectly (it was unchecking “keep with next” that did it for me). Blessings be upon you.
Tina
I finally got rid of the annoying black square! Your step by step instructions are awesome! Thank you so………..much!
Trinity
Thank goodness for Google and you. I was close to a breakdown trying to get rid of the ominous ‘little black box’ and the gaps it was leaving in my document. I wish you joy, happiness and prosperity for the rest of your days.
Michael Sheehan
Thank you, Trinity, for your kind words! Glad that the article helped!
Teresa U
With Word 2016 you could actually double click on that little black box and the window would open up so that you could uncheck the boxes. With Word 2019, I can’t double click on it.
Can we bring back the double click?
Michael Sheehan
Hi Teresa, yes, as software “evolves” it is supposed to get easier. Unfortunately, it usually means that more features are added and that adds a layer of complexity. And, old versions are discontinued or no longer supported.
Martin McHugh
I have a very annoying problem that I hope you can help me solve.
In recent Word documents, I’ll reach a point, usually near the end of the line, where whether I use the right arrow key, type in anything, or move the mouse cursor there, I get dropped down to the bottom of the document. This happens every fourth or fifth paragraph.
I get back to where I was by hitting “Control Z” of course, but the same thing will happen if I try any moves at all.
I work with Track Changes on as I’m editing books and want their authors to see what I’ve done.
I can get around this temporarily by hitting “Show All Changes” and doing what I want, but that’s cumbersome, and it doesn’t always work.
I’ve tried a new keyboard, but the same problem. I’ve uninstalled and reinstalled Word Office 19, but that didn’t help.
So I don’t think it’s the hardware or the Word program, but I’m at a loss as to how to fix it.
This problem started only recently, but it’s happening with more than just one document.
Any suggestion you can offer me would be greatly appreciated.
Many thanks,
Marty
Michael Sheehan
Hi Martin, that is a tricky one. It is hard to understand exactly what is happening without either seeing the document or a video of what you are describing. It could be any number of things, honestly. If you can share a video of what is occurring in action, I may have a better idea.
Zureesha Sajid
What if these little pesky dots are with my table and wouldn’t let me add a caption
B Primrose
Thanks, that’s brilliant. If only Microsoft could have made it this easy…
Amy
Not all heroes wear capes, my friend. Thank you!
Jeannie Munson
Thank you!!!! I so appreciate your timesaving tip!
Pastor Greg
Bookmarking your page. You saved me hours of frustration on this one. Thx
Peter
You are the man!! Thanks a bunch!!
Ali
Brilliant it worked
loralpepoon
it works! Thank you so much!
Nader
Still have the same issue, big squares still there!!
Helene
Thank you so much… easy to follow and that way a researcher could issue his article.
Stacey Martinson
Oh thank goodness! I hate those little black squares! I’m so glad I found this to get rid of those awful things! Thank you!!
Kathleen
Thank you – solution posted 2013 and still being used in 2020. Thank you so much – I hate those little black squares.
SG
awesome!
Caren Moffett
Thank you so much!!!
Pamela
Thank you so much!!
Jackson F.
Bless you, even though my forehead is already bloodied. I have cursed this little stupid box for days.
Michael Sheehan
Haha, yes I think many people felt the same way you did!
Laura
THANK YOU SO MUCH!!
Emma
This is the first time I Have needed to do this, and it was driving me nuts! thanks for you help.
Michael Sheehan
Glad that it worked for you!
MikeNB.
The method described by HTD only works for a single paragraph. On a PC: if a document has a couple of hundred of these black bullets, Select All of the text, then open up the Paragraph dialogue as HTD says. The tick-boxes will be coloured heavy blue. Tick them all, then untick them all and click OK. That should clear all the black bullets.
Ricci
Thank you!! I’ve been puzzling over the same thing and finally could get it solved, thanks to your advice.
Ces
This drove me crazy…Thank you!
Guillaume Feldman
Good karma points for you! Microsoft couldn’t provide the answer so thanks for resolving my headache
Malcolm Chisholm
Brilliant! Thank you.
Rick
Worked like a charm. Those pesky squares are gone!
My version of word is Mac 2011, Version 14.6.5.
Sasha Owens
This was the most helpful blog I’ve went on. Thank you! I hope others can get it fixed as easy as I did following your steps.
PR
This did not work for me, but my little box is different – not the little black box you show. My box is open with an arrow going up and down and side to side inside of it. When I put my cursor somewhere to remove formatting it pops up and won’t go away. Thanks anyway.