I currently have a DISH setup at home currently servicing our living room, two bedrooms and our kitchen. The living room is powered by the new DISH Hopper 3, a truly amazing set-top box, with the ability to watch/record up to 16 channels at once. Our kitchen has a Super Joey when enables two additional tuners so that we not only can record Prime Time (Anytime) automatically, but also allows us to watch/record more shows simultaneously. Our two bedrooms have two Wireless Joeys which allows us to connect to our TVs without the need to run coax cable everywhere. But the mancave needed TV, especially with the kickoff (literally) of the football season. So, I figured I would get another Wireless Joey and hook it up in the cave. But I didn’t want to have to schedule an appointment to have it installed. As it turns out, you don’t need an installer (unless you really want one to help). I was able to set it all up in a matter of minutes and it couldn’t have been easier.
The Wireless Joey does require a DISH Hopper Wireless Access Point. This is essentially a wireless router configured to exclusively connect with up to three Wireless Joeys. It creates a secure, private network for the (up to) 3 Wireless Joeys to connect to using the 802.11ac protocol. (Note: you cannot connect other devices to this protected wireless network.) You can have two DISH Hopper Wireless Access Points in your home which means you could potentially have up to six Wireless Joeys active. It’s important to note, each additional DISH device does come with an additional monthly charge. For the Hopper, it’s $15, for the Joey, it’s $7 and for a Super Joey, it’s $10 per month. There may be some one-time fees as well for the Hopper Wireless Access Point or other equipment. I would contact DISH if you have questions on your particular setup.
Shop on HighTechDad
The product shown below (and related products that have been reviewed on HighTechDad) is available within the HighTechDad Shop. This review has all of the details about this particular product and you can order it directly by clicking on the Buy button or clicking on the image/title to view more. Be sure to review other products available in the HighTechDad Shop.
-
 Dish Wireless Joey$83.99
The initial installation of the Hopper Wireless Access Point (I’ll call it the WAP because I’m lazying typing it all out) is fairly straight forward. As I didn’t do it this time around, I won’t go into great details but basically what you do is connect the Hopper Wireless Access Point to your Hopper via an Ethernet Cable (there are two Ethernet jacks in the back of the Hopper – one is for your Internet from your router and one is for the WAP. You will go through some on-screen setup that ensures your Hopper WAP is connected, activated and working.
If this is the first Wireless Joey you are installing, you will get the Hopper WAP as well as part of your order, I believe. There are instructions that are pretty clear with photos to walk you through the process. But as I said, I already had my Hopper WAP installed and powering two other Wireless Joeys so for me it was just a matter of connecting the third one. And it was SO EASY!
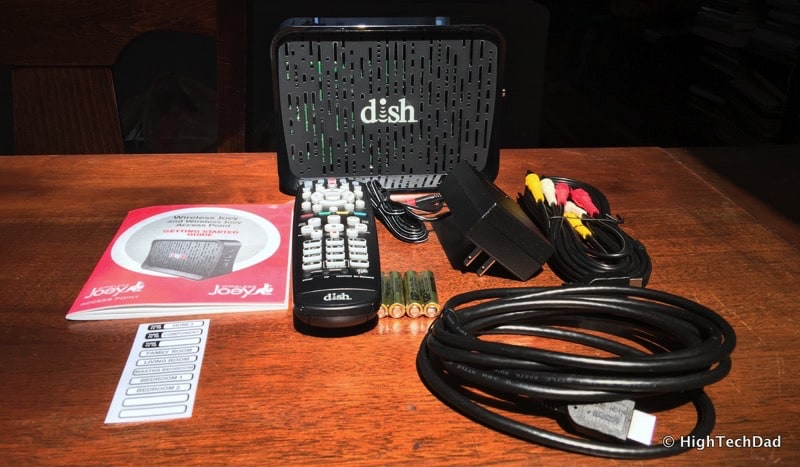
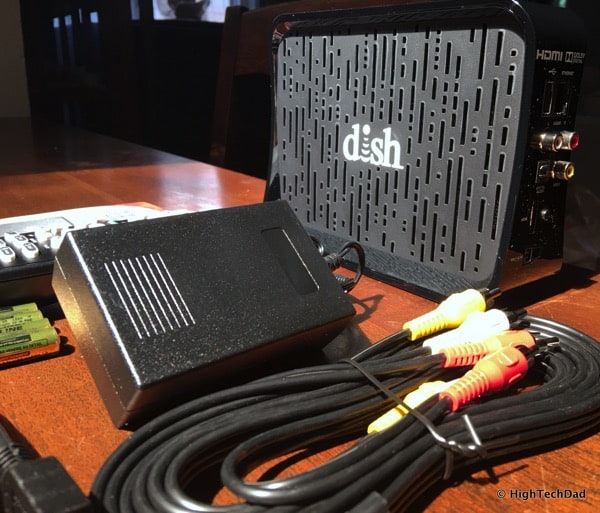
The Wireless Hopper package comes with everything you need: Wireless Joey, Power Cord, HDMI cable, A/V cables, Remote & batteries and an instruction manual. I was able to bypass the WAP setup process and went straight to connecting the Wireless Hopper to the Hopper WAP.
How To Set Up a DISH Wireless Joey
Please the Wireless Joey in the location where you want it to be. Since this runs off of WiFi, you will want to place it off of the ground. The higher up, the better. The same goes for the Hopper WAP. Be sure both are clear of obstacles or obstructions, much the same way you would treat a regular WiFi router. Also, you don’t want the two devices to be too far away. If they are, or they are obstructed in any way, you will have a bad wireless signal which translates to poorer TV reception. Note: as part of the setup, you will be told if your signal is good or poor. And after you link everything up, you can play around with positioning to get the best signal strength.
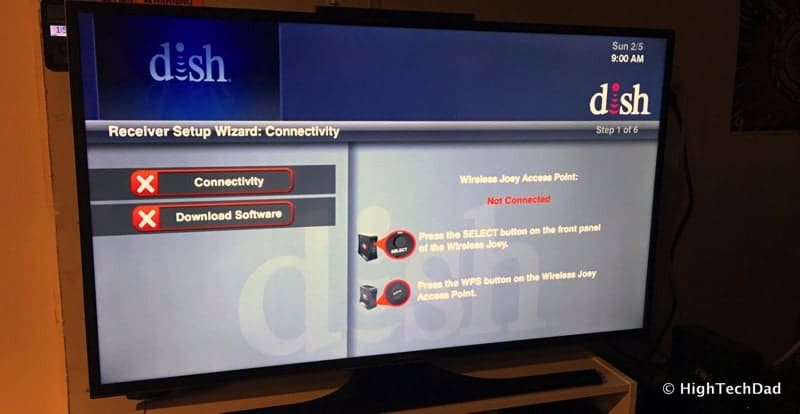
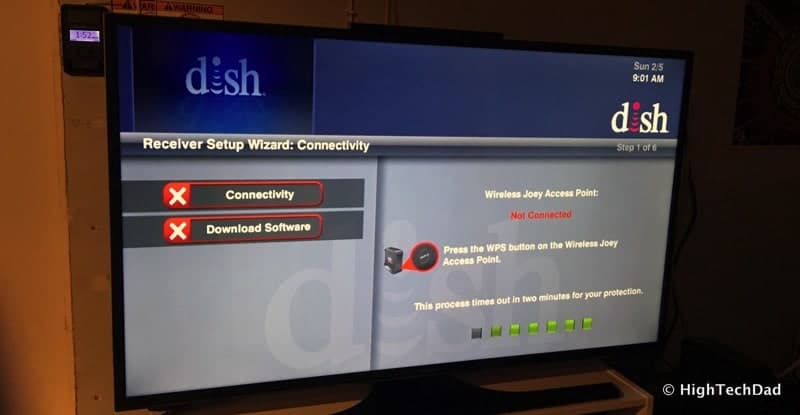
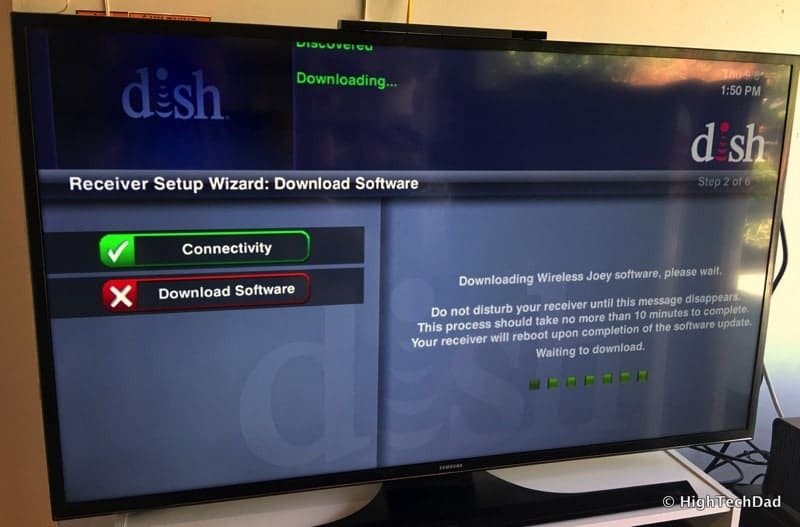
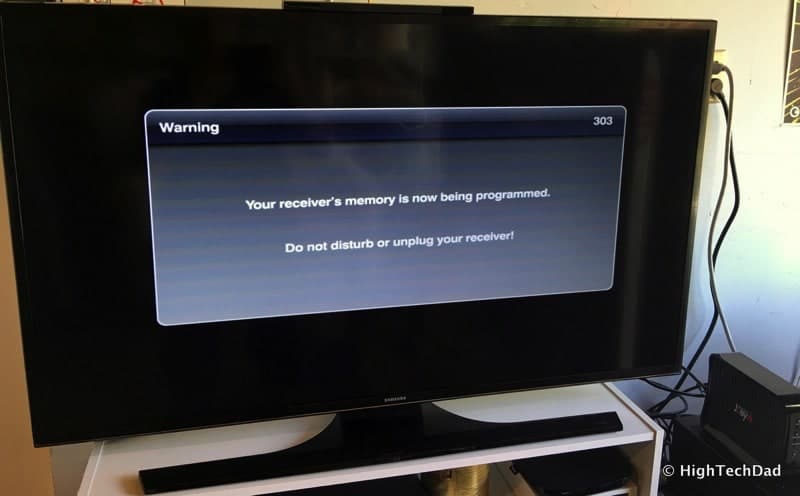
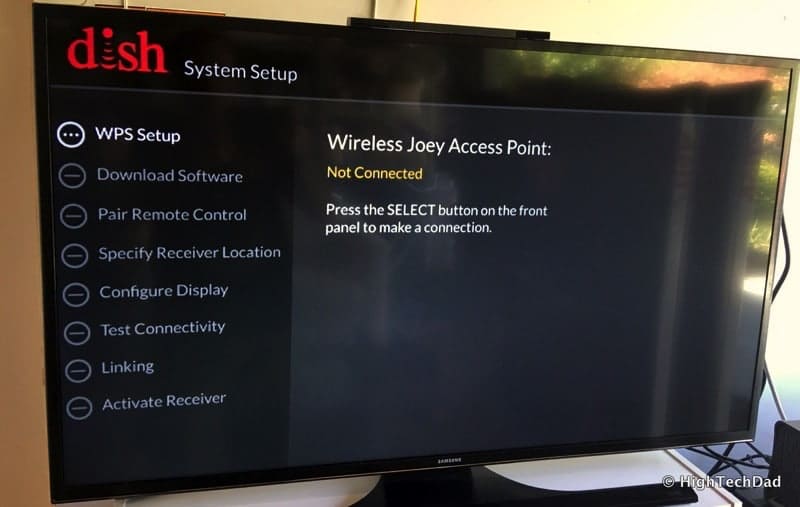
Anyway, to do the setup, first you connect the HDMI from the back of the Wireless Joey to your TV. Then you plug in the Joey power supply. You will want to have the TV on and tuned to the right HDMI (or A/V) input so you can see the instructions on-screen. Honestly, you don’t really need the manual as all of the on-screen instructions are quite clear. I took photos of my TV as I went along. They are shown below.
First, you will see that the Wireless Access Point is not connected. You then press the SELECT button on the front of the Joey.
You then have two minutes to go and press the WPS button on the front of the Hopper WAP. This is the easy connection linking part.
Hopefully, the two devices will connect easily, If not, you will get some instructions on the screen on what to do to troubleshoot. Mine connected on the first try. The Wireless Joey will then download a software update.
The software has to be downloaded to the Wireless Joey (which could take 10 minutes or so).
The Wireless Joey may restart itself a few times as the software update is installed. At one point it said it wasn’t connected to my Hopper WAP but it later automatically connected.
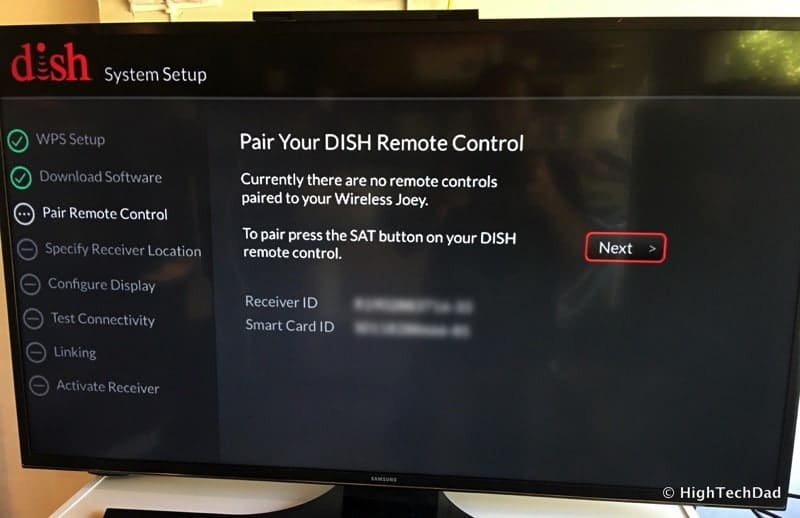
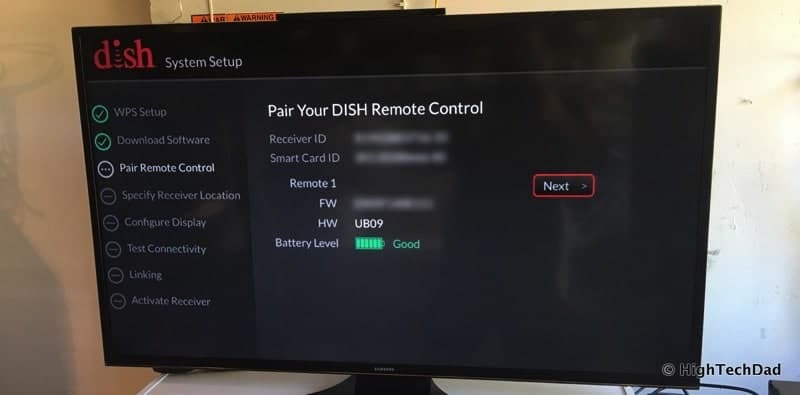
Then you pair the Wireless Joey with the remote control it came with. This process as well is quite easy and you can follow the on-screen instructions. Press the SAT button on the remote and it should automatically connect.
Once it connects, you pair it with the Wireless Joey.
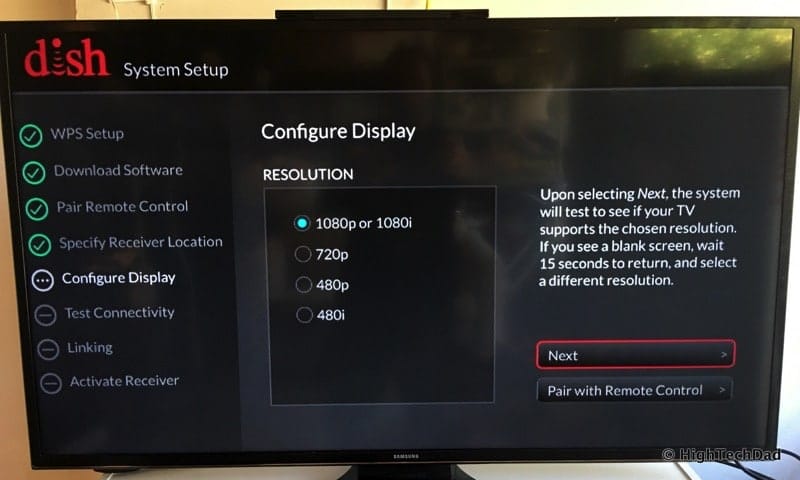
Then you can use the remote for the rest of the configurations. The next step is to set the resolution of the connected TV. I set mine to 1080p or 1080i since my TV is an HD one.
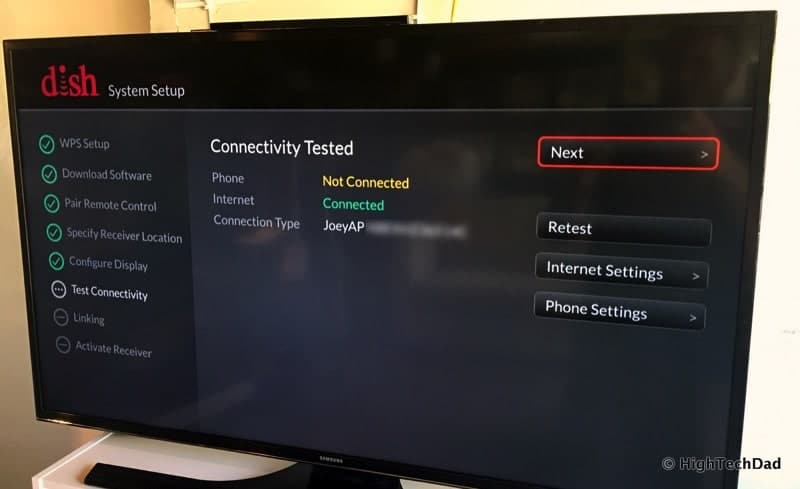
Next the Wireless Joey goes through a connectivity test. I don’t have (or need) a phone line so it passed over that. It also tested the Internet connectivity which is important for doing some OnDemand movies and services like Pandora or Netflix. It passed on this test. Internet is basically pulled from the Hopper which is connected to the Hopper WAP (which is then connected to the Wireless Joey).
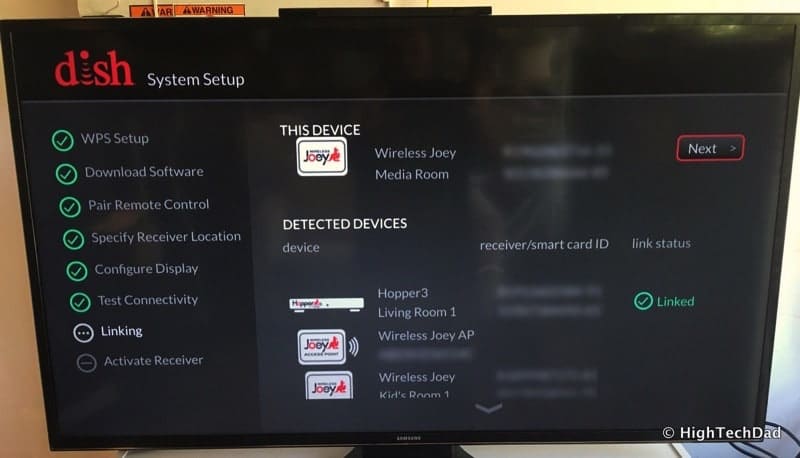
You are almost done! Next your Whole Home connectivity is confirmed and other linked devices within the Hopper network are displayed.
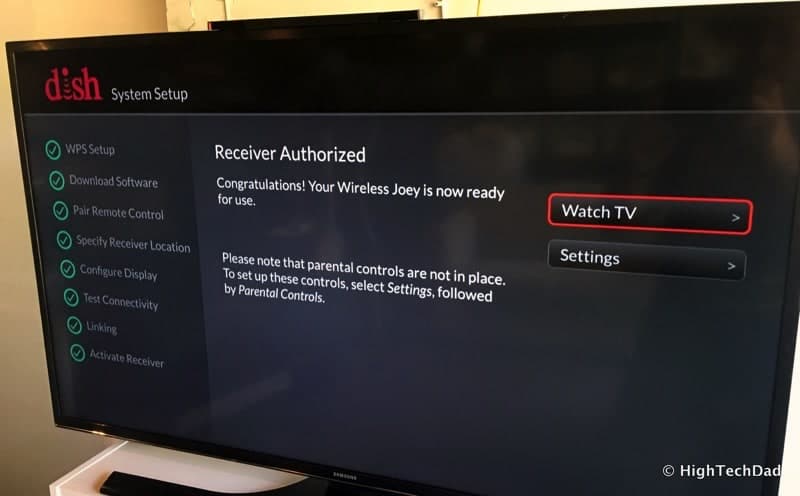
And finally, your Wireless Joey is “authorized” and ready for use! You can then go directly into watching TV or items you have previously recorded and stored on your Hopper.
It’s incredibly easy! The nice thing is, once you have linked your Wireless Joey with the Hopper WAP, you can unplug the Wireless Joey and move it around your home and get TV anywhere you have a relatively strong signal. Want to watch TV in the back yard with a projection screen? Easy to do (assuming you have power). Need TV in a guest room for a couple of days, just move the Wireless Joey there and then move it back when you are done. I must say I like the flexibility and the fact that I don’t have ANY additional coax cable running through my home. So if you already have a DISH setup at home, consider extending your “whole home” viewing experience by simply adding a Wireless Joey or two to your environment! Oh and check out some of the other articles I have written about DISH (including the HopperGO).
Disclosure: I have a material connection because I received a sample of a product for consideration in preparing to review the product and write this content. I was/am not expected to return this item after my review period. All opinions within this article are my own and are typically not subject to editorial review from any 3rd party. Also, some of the links in the post above may be “affiliate” or “advertising” links. These may be automatically created or placed by me manually. This means if you click on the link and purchase the item (sometimes but not necessarily the product or service being reviewed), I will receive a small affiliate or advertising commission. More information can be found on my About page.
HTD says: DISH truly gives you a viewing experience just about anywhere you want within your home, cabled or wire-free, and even remotely. Gotta love those options!
HighTechDad's Ratings
-
Ease-of-Use
-
Family-Friendly
-
Price Point
-
Features
Summary
DISH truly gives you a viewing experience just about anywhere you want within your home, cabled or wire-free, and even remotely. Gotta love those options! For the actual setup, I give the Wireless Joey pretty high marks. You don’t really need an installer to do it for you if you have ever set up a wireless router. It’s pretty simple. But on the flip side, the only reason I give the “family-friendly” a bit lower is because your kids (unless they are super geeky), probably can’t do it. Price point is reasonable and the features are just like any other DISH attached device (with the added bonus of being able to put it just about anywhere).


1 comment
Barbara
My Joyce I just need to know where the skinny wire goes in on the joyesy