I recently got my iPhone 4 and consequently wanted to prepare my iPhone 3GS for my children to use as an “iPod Touch” – iPhone but without the cell service. I have already done this with my original iPhone. Honestly, it is a great way to extend the life of your “retired” iPhones. As I was going through the prep process (e.g., removing all of my work, social media and non-kid friendly apps and adding in lots of games), the iOS 4.0.2 Operating System update came out that fixes the PDF exploit issue. I figured it would be smart to update all of my devices to close this exploit vulnerability.
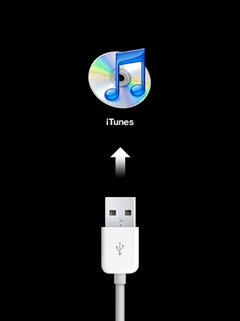
I’ve done so many updates, I was really surprised to actually run into an issue, but I did. Something on the old iPhone 3GS got corrupted in the process and iTunes asked me to do a RESTORE. I was presented with this on the iPhone screen:
Restoring your iPhone is actually sometimes a good thing to do. It can fix issues that your iPhone may be encountering and assuming that you have been regularly backing up your iPhone, the process is painless. Or so I thought. I went through the download of the new iOS software and then proceeded with the Restore and then I got an error in iTunes (I believe it was error 22 and then another which was 23) that said that the process could not be completed. So I tried it again…and again…and again. The same issue continued to happen. I was stuck in what is known as the Recovery or Restore Mode Loop. I tried it on a Mac as well as a PC but with no luck.
But here are a couple of things you can try that may help (the second one worked for me).
DFU Mode
One recommendation is to put your iPhone into DFU Restore Mode. DFU stands for Device Firmware Update. Essentially, when you enter this mode, your iPhone attempts to do the restore before loading the Operating System. Normally, during a restore, your iPhone loads the OS first and then does the restore.
To go into DFU Mode, it is a bit tricky. Here’s what you do:
- Turn on your iPhone
- Connect it to the dock or your USB/iPhone cable
- Have iTunes running – this helps you know when you are in DFU mode
- Hold the Power button (at the top of your iPhone) AND the Home button together for 10 seconds
- Release ONLY the Power button while continuing to hold the Home button
- At this point, iTunes may notify you that you are in DFU mode (or it may not). You may have to wait to see if iTunes recognizes if it is in this mode
I must admit, it is a bit tricky to get into DFU mode. If you do it incorrectly, you may see the “Connect to iTunes” screen on your iPhone. This means that you did NOT enter DFU mode. If, however, you see a black screen on your iPhone (and it may take up to 60 seconds for it to get there), you will probably be in DFU mode.
Once you are in DFU mode, you should try the Restore process again. NOTE: entering DFU mode DID NOT get me out of my Recovery/Restore loop! I had to use a different solution to get out of the loop. If DFU mode does not work for you, read on!
iRecovery App Process
For me, the traditional methods (Recovery and DFU Mode Recovery) did not work for me and my iPhone 3GS was still in a Restore/Recovery loop (and I was still pretty frustrated). Using the power of web searching, I discovered a process that had helped a bunch of other people that I figured I would try out myself. There is a terminal application for Mac/Windows called iRecovery created by the folks at ihackintosh.com, I believe (sorry if it was created by someone else but that is where I read about it), that talks to the iBoot/iBSS in the iPhone (or iPod) via USB. I’m not sure about the technical details or mojo that works there but, it did work for me!
I recommend reading this page that talks about the process and has the iRecovery download link.
WARNING: While many people, including me, have used this process and it has been tested to work, there is always the possibility that it will not. I, nor ihackintosh.com are responsible for any damage caused by this app or the process it uses. Use it at your own risk!
iRecovery works on both Macs and Windows. The article that talks about it is a bit dated (July 18, 2009) so I wasn’t sure if it would work with the latest version of the iPhone iOS nor my computer OS (I was using a Mac).
These are the steps (and I pretty much followed what was listed in the article):
- Download iRecovery (it has both Windows & Mac apps in it) from this page
- MAC users can skip this step (and I haven’t tested this either)
- You need to install libusb that is included in the download files. If you are running Vista or Win7, you will have to install Libusb-Win32. See steps 2 & 3 directly below:
- Right click on this file. Select Properties | Compatibility Click the “Run this program in compatibility mode” box and select “Windows XP (Service Pack2)” from the drop down list.
- Right click again and select “Run as “Administrator”. Follow the installation instructions.
- Start iRecovery in your Terminal or DOS (Console) using one of the commands below. Note that you will have to issue the command from where iRecovery is located.
iRecovery –s(I believe this is the Windows command)sudo iRecovery –s(Mac command – you will need to enter your admin password if on a Mac)
-or-./iRecovery –s(Mac command – note: this is the command that worked for me!)
- Run the following commands once you are in iRecovery:
setenv auto-boot true
saveenv
/exit
- Now, simply reboot your iPhone (hold HOME & POWER button for 10 seconds)
Once your phone reboots, it “should” simply connect to iTunes and you should be able to do a restore (or the restore process may automatically start once iTunes connects to your iPhone).
The iRecovery process worked for me. However, no guarantees that it will work for everyone. But I would love to find out if it worked for you. Please leave a comment with details on what did or did not work. If you do, please include the model of your iPhone and what software version you are on. GOOD LUCK!
HTD says: See? With some patience and fancy code, you can fix just about anything (hopefully)!


2 comments
RaffiHirt
My iPhone 3GS got stuck in recovery mode after I updated to iOS4.3.3. The iRecovery method worked to get it out of there. However, I was battling quite a bit because I’m not that experienced in working with the Console. Here’s a few beginner’s tips:
– After installing libusb, you go to the Console via the start button and the “Run” command on the bottom right. Type “cmd” to open the console.
– In the last line displayed, you see a location on your computer. Both “irecovery.exe” and “readline5.dll” need to be located in that exact location in order to start iRecovery. In my case, they were still in my Download file after installing.
– After that, you can simply follow the steps above. It worked for me with the very first try.
– If iTunes doesn’t open automatically after your phone comes back to life, open it manually. And if you don’t want to go through the whole hassle again, immediately disable the iOS update…
iPhone Developer
Blogs are good for all, where we have a lot of information on everything good job keep it upand post quite well, this is one of the best articles I’ve ever seen! This is a great site and I have to congratulate thecontent.
I appreciate it!