I must admit, I was a bit stumped by a Microsoft Word for Mac (version 16/Office 365) issue that my stepmom was having. She was under a deadline trying to edit a series of documents sent to her to review. She was NOT the author of the documents, so her comments and edits had to be marked as being from her. The problem was, she was making the edits, and then when she saved the document and reopened it, her name (as the “reviewer”) was simply being shown as “Author” and not as her name. This meant that when another reviewer opened the document, they wouldn’t know my stepmom’s edits from someone else’s. This was not a good thing.
As with most support issues I encounter or am asked, I often turn to Google to see if others had encountered the same or similar issue. But herein lies a problem. Word for Mac and Windows have both evolved over time. And with each new version, there are subtle and not so subtle changes to the features and functionality. And there are platform differences. For example, on Mac, there is no Trust Center. And on top of that, what works on Windows often doesn’t on the Mac versions. So, in filtering and reviewing possible solutions, there are a lot of different types of “solutions” that may have worked in previous versions (or on different platforms) that don’t work in the current versions of Microsoft Word. It was a bit maddening.
So here is the scenario. I’m writing this specifically for Microsoft Word for Mac. There are probably other (similar) solutions for Word for Windows, but that isn’t covered in this article. You receive a document to review and make edits to. You have Track Changes on. You make a bunch of changes, edits, and comments. You save and close your document to come back to it later. But when you re-open your edited document, all of your edits and/or comments no longer have your name. They have been generically replaced with the word “Author.” It’s pretty maddening, right?
Well here is how to fix. And it’s super easy!
How To Fix Track Changes in Word for Mac Changing to “Author” and Not Your User Name
The fix of changing “Author” to your name is incredibly easy as I said. The hard part was finding where that setting was located. But I have done that hard part for you.
First, if you have a document that is showing “Author” instead of your name, stop doing any edits! I’m not sure if there is a way to change any edits back from “Author” to your name. (If there is and someone has discovered it, please leave a comment!)
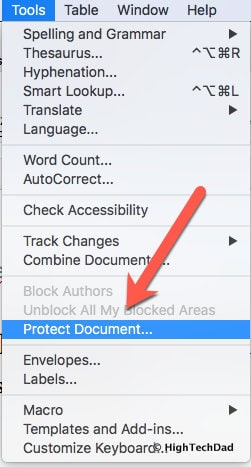
Next, with the document still open (note: this is a per document change and not a global change), go over to the Tools menu.
In the Tools menu, select “Protect Document…”
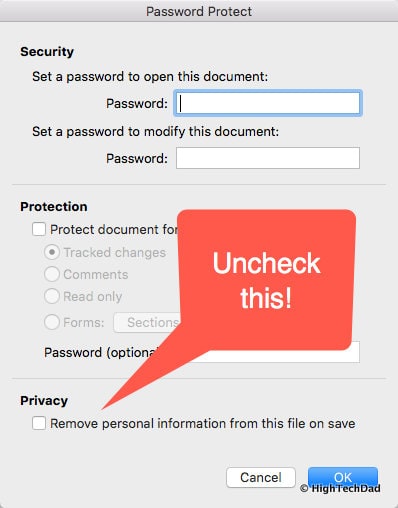
When that dialog box opens, take a look at the bottom. In the Privacy section, there is a setting that says “Remove personal information from this file on save.” If this item is CHECKED, Word is essentially removing all author information from the document when it saves it. This is designed to preserve your privacy, but in this case, it actually is causing a lot of headaches!
UNCHECK that box. Then, save your document.
After that, you can go on with your comments and editing. And, your specific author name will be saved. If you want to test this out, just close your document (after you have done the step above and saved the document) and re-open the document. Your username should now be displayed properly and not “author.”
UPDATED: Below is a video I put together showing the issue as well as how to fix it.
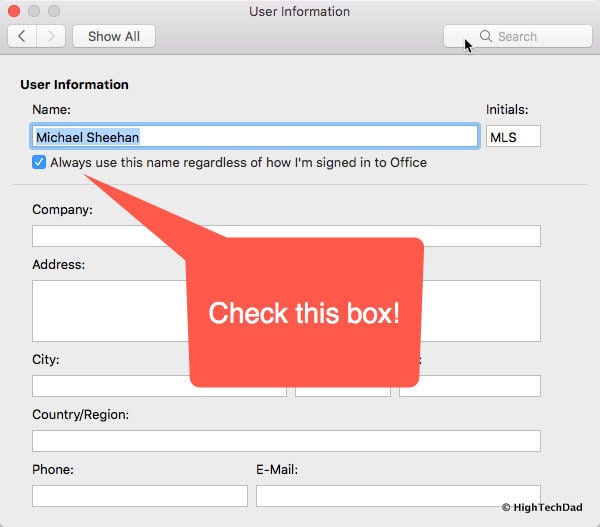
Bonus item! If you want to ensure that your name is correctly displayed in the document edits (and perhaps not showing your Office365 user information), you need to go to Preferences > User Information, and be sure that “Always use this name regardless of how I’m signed in to Office” is CHECKED! That way you can be sure that your edits accurately reflect who you are.
Hopefully, this trick worked for you! Remember, this is only for Word for Mac. However, in Windows, I believe it is a similar type of setting that has to do with protecting your privacy. If you are having this issue on Word for Windows, look under your privacy settings for something similar.
If this fix worked for you, please leave a comment. Also, you can share this article via the tweet button below.
Happy writing and editing!
HTD says: This is the easy way to fix the issue of incorrectly showing “Author” instead of your username when editing and tracking changes in Microsoft Word for Mac documents.


17 comments
Stacey
Hi Michael – thanks so much for this. I’ve struggled with the same issue (comments appearing as “Author”) on PowerPoint for Mac. Have you been able to figure out a solution for that program too?
Pete Russo
Thanks but I hate having to do this with each document – is there a way to fix the issue for all?
Michael Sheehan
Hi Pete, for the documents affected, I believe you have to do them individually. However, below the video on my article, there is the “bonus” section where you can set the default user name information.
Bruce from Winnipeg
Awesome! I knew how to do this for MS Word for Windows but couldn’t find it for Mac. Looking up articles always had the Windows version. I came across your article and there you go! Easy!
Michael Sheehan
Thanks, Bruce for the follow-up! Good to know that it worked for you!
Editor
Thank you SO much! I just started working as a freelancer for an online editing service, and this was driving me crazy!
R Frato
Many thanks for your clear and incredibly helpful post! I had spent more than an hour trying to figure out how to do this.
Sheryl
Thank you SO MUCH! This fix and the tip from Kaija about how to change the existing edits saved me from having to redo a big editing project.
alp
Thank you so much. Perfect Fix. Would have never found that myself.
Michael
Thank you so much!! I was looking for an hour on German support groups but no success, so happy you put this together!!
thomasagbaedeng
Yes, it did fix my bug! Thanks
Kaija
To change the edits already made, after applying the fix described in this article, save the edited document and then use Tools >Track Changes > Compare Documents to compare the edited document with the original document (assuming that the original/unedited document is available). The dialog box should show an option for “Label changes with” that will replace “Author” according to your MS Word settings and/or preferences.
frances
The author names show up when the document is open, but the names don’t print, only the changes or comments. I can’t find how to fix that.
Maureen Yantz
Thank you very much, Michael. I still would like to know how to change edits already made to my name.
Carrie Schneider
thank you! was banging my head on my desk over this one….
Michael Sheehan
Glad that the article helped!
Michael Sheehan
Yes, this was a tricky one to find and figure out. Glad the article helped.