This How-To article comes by way of a HighTechDad.com reader who had seen my Fix-It article, “How to Remove Little Black Square Paragraph Formatting & Page Break in Microsoft Word,” but had a completely different issue that seemed to be related. What she had encountered was a row of repeating black boxes within Microsoft Word and she couldn’t figure out what they meant nor how to fix it.
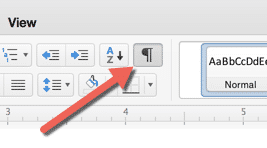
Usually, a black box or square within Microsoft Word signifies some sort of formatting or a break or a non-printing character. Non-printing characters are show by hitting the ¶ button on the Microsoft Office toolbar.
As I worked through some trouble-shooting with this reader, we discovered that the line of repeating black boxes within Microsoft Word was not a non-printing character. In fact, it was something else.
For those who don’t want to read the details below, I also created a video that explains what the repeating black boxes are, how to remove them and how to prevent it from happening.
Repeating Black Boxes are…
It turns out, the repeating black boxes were actually a horizontal line. The mystery, though, was how they got there in the first place and how to remove them. What I discovered was that Microsoft Word, and this is true for both the PC and Macintosh versions, has something called Auto-Format which will do a variety of things as you type. Creating formatted horizontal lines is one of them.
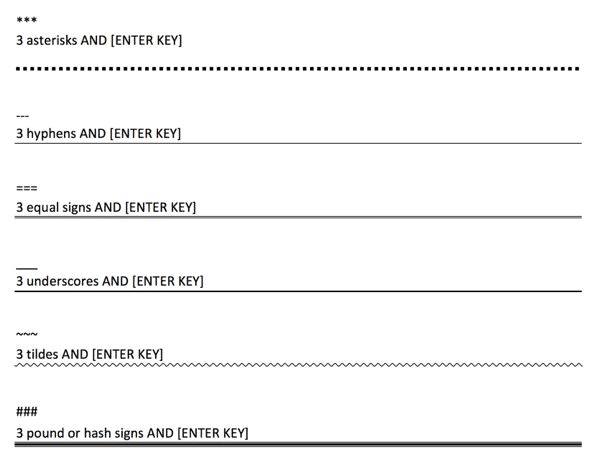
Below are the types of horizontal lines that Microsoft Word automatically creates when you type three certain characters in a row and hit the ENTER key (assuming you have this feature enabled).
With the case that was submitted to me, hitting 3 asterisks (***) in a row and pressing the ENTER key created the repeating black boxes – essentially a horizontal line of black boxes. You can create other horizontal lines by repeating the following characters 3 times and hitting enter:
- Underscore
- Dash/Hyphen
- Astericks
- Equals
- Tilde
- Hash/Pound
So, once I identified what this line of repeating black boxes was, I needed to figure out how to remove it easily as well as potentially prevent it from happening. It’s actually quite easy to do both.
Removing the Repeating Black Boxes
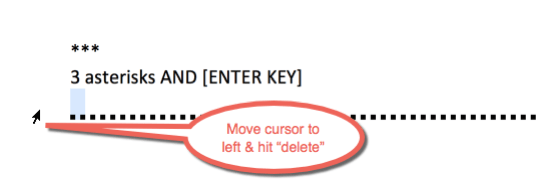
To remove the repeating black boxes, simply highlight them by clicking in the left margin (note: only a few spaces will highlight – 3 actually – because you are highlighting the 3 characters.
Once those are highlighted, simply delete them.
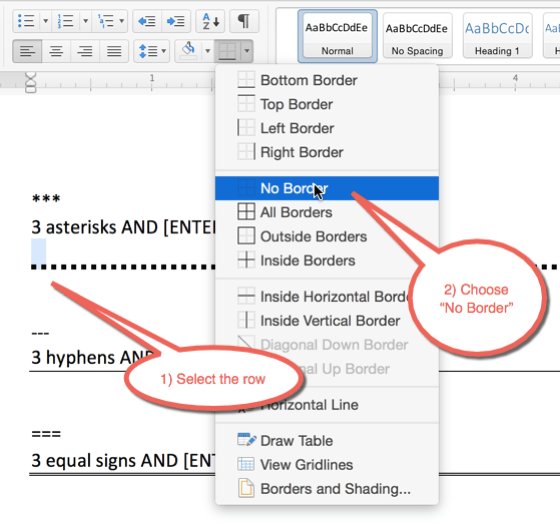
Another way is to simply remove the formatting of the line. You do this in a similar way. Highight the line, then go to the Border formatting box and choose the “No Border” option.
That will remove the line.
How to Prevent the Repeating Black Boxes from Happening
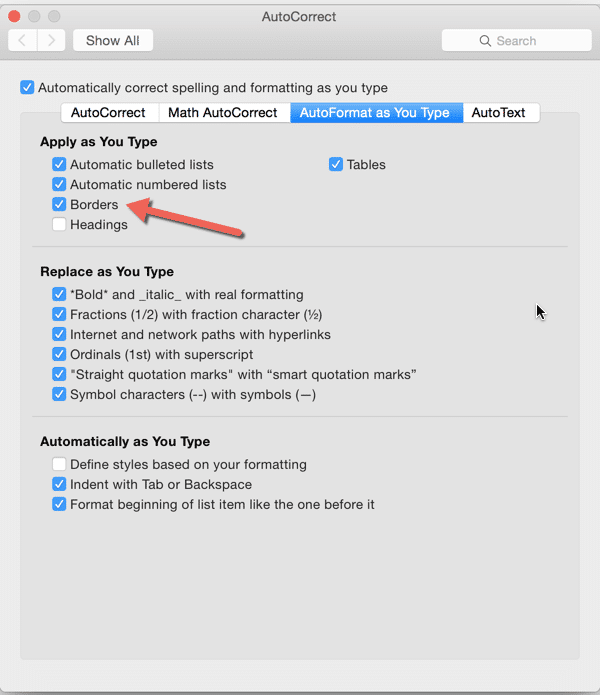
It’s actually quite easy to prevent this auto-formatting from happening. Simply go into the Preferences (on the Mac) or Options (on the PC) of Microsoft Word and head over to Auto Correct.
The screen shot above is from Microsoft Office 2016 for Mac (Preview) but for the most part, the settings are generally the same for Mac and PC versions.
- Mac Word 2016 & 2011: Preference > AutoCorrect > AutoFormat As You Type and there, uncheck “Borders.”
- PC Word 2013: Options > Proofing > AutoCorrect Options > AutoFormat As You Type and there, uncheck “Border lines.”
Once you turn that off, you can type three of the characters mentioned above in a row and then hit ENTER and the line won’t automatically be created.
Hopefully this helped! And be sure, if you have any questions like this to head over to my Tech Support page and ask. Who knows, I may make an article from your question.
HTD says: Don’t you love how options buried away can make you scratch your head sometimes?



2 comments
Nicholas
This doesn’t seem to work for WORD 2022. (16.64). It is a bit of an affliction. One cannot darken any section and changing to no borders does not solve the problem. Any thoughts?
YW
Thank you!!! Other answers online didn’t solve the problem, but your article above DID.