Apple’s iOS 8 has been released and people are complaining that they have to delete applications and/or data and media in order to install the new mobile operating system. This is true if you do an OTA (Over The Air) update. Sometimes, even connecting to iTunes on your computer and trying to do the upgrade there prevents you from doing so if you don’t have enough free space on your iOS device. But there is a better way to install the update and NOT have to delete any data, even if you don’t have much free space on your iOS device.
First some non-technical information on why Apple needs so much space to install the new iOS. If you choose the OTA upgrade process, first, your device needs to store the upgrade file. If you download the OS on its own (on a computer, for example), the size of the file is probably a couple of GBs. Most likely, Apple compresses the upgrade file for OTA updates. That means that it then needs to uncompress the file prior to upgrading your OS. It needs space to do that. Then it needs to swap out the old OS data files with the new ones. So at one point, during an OTA update, you have old and new files together which requires a lot of space. Eventually, the OTA file and the old OS files are deleted. While this process is potentially convenient (you don’t need to connect to a computer), it is not that efficient.
Similarly, you could try to do an upgrade by connecting your mobile device to iTunes on a computer. But this, as well, may require you to free up space in order to do the upgrade.
YOU DON’T NEED TO DO IT THIS WAY!
It’s actually better to completely wipe your device and install the new iOS fresh and then restore from a backup. This process cleans out garbage and can actually make your iOS device run more efficiently.
That being said, here is the BEST way to install iOS 8, in my opinion.
The Best Way to Install iOS 8
If you follow these steps, most likely you won’t have to delete any of your data or media or apps.
Note: this processes may take a while depending on the size of your device and how much you have on it. Set aside an hour or two just in case.
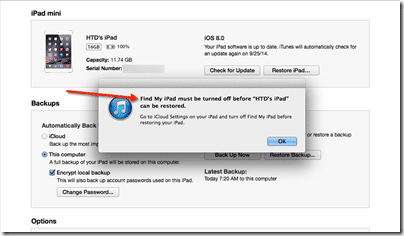
- Turn off “Find my iPhone/iPad” on your device otherwise, later in the process you will see this warning:

- Tip: if you set a password under “Encrypt local backup” then you don’t have to enter in all of your passwords for email and such.
- Connect your iOS device to your computer running the latest version of iTunes (you might want to update all of your apps while you are in there). You can let iTunes sync and back up (but you will back up again later on in the steps).
- Download the appropriate iOS 8 (restore) file. See my previous article for links. Save it somewhere on your computer.
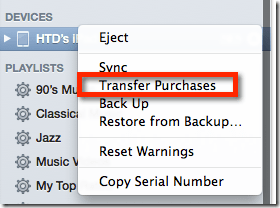
- In iTunes, transfer your purchases from your iOS device. You can left-click (PC) or control-click (Mac) on your iOS device within iTunes to show the “transfer purchases” option.

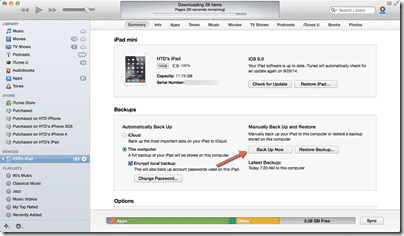
- Once that is done, you should back up your iOS device.

- Once the backup is complete (AND THIS IS CRITICAL, BE SURE YOU HAVE A BACKUP!), you are ready to restore.
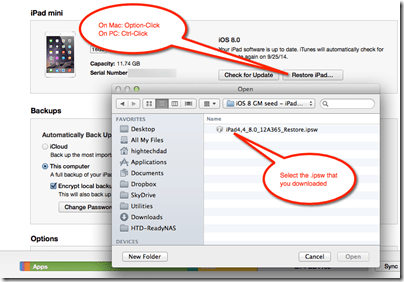
- On a Mac, Option-Click the “Restore” button. On a PC, Control-Click the “Restore” button.

- Select the .ipsw that you downloaded in Step 4 above.
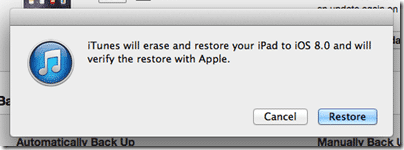
- Click “Restore”

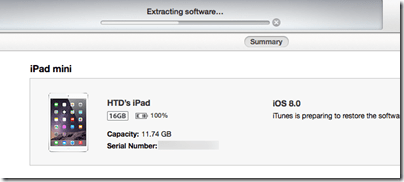
- The update will be extracted and verified with Apple.

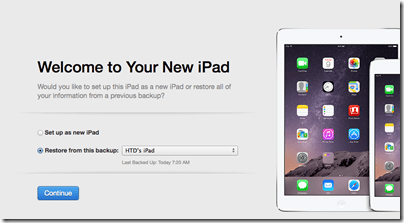
- Once your iOS device has had iOS 8 installed, it will ask you if you want to set up as a new device or restore from a backup. Choose Restore from backup and select the backup that you just made earlier (look at the timestamp).

- Then you sit back and wait while all of your settings, apps and data are copied from the backup to your iOS device. (Note: first, your data/settings are restored, your device will restart, and then your apps, music, movies, podcasts, etc. are copied over.)
Assuming all goes well, your iOS device will have a fresh install of iOS 8 and ALL of your data will be back on it, without you having to delete anything.
Hope this worked for you. Leave a comment with any questions or other information you may have.
HTD says: You DON’T have to delete to upgrade!



2 comments
RDodds
Thanks for these instructions.
I ran into one thing that deviated from the instructions above. When I CTRL-clicked on Restore iPhone button on my Windows computer, I was not given the option of navigating to the .ipsw file I had already downloaded. Instead, iTunes somehow new that I wanted to install the iOS 8 update.
My only thought is that this may have happened because I had tried on previous occasions to perform the update, only to be timed out since so many people were hitting Apple’s servers.
Not a big thing, but I thought I’d share it in case others are in the same position of trying to follow these instructions after having attempted earlier updates that aborted.
Eric
At least on Windows 8 & the newest version of iTunes (currently, version 12), CTRL-click doesn’t give you the option to select the file location….it’s SHIFT-click. I’m actually in the process of going through these restore steps as I type this, & that’s what I found to work.
Hope that helps to clarify these steps even more!