For all of those people who are interested in breathing a little bit of life into an older MacBook Pro, this post is for you. My non-unibody 15″ beaten and worn MacBook Pro had about 3 GB of free hard drive space on it. And this is even after I had upgraded it about 2 years ago with a 320 GB Western Digital Scorpio Black hard drive. All of my recent video reviews have been sucking up precious space on my hard drive and even despite regular archives, it had become just too full.
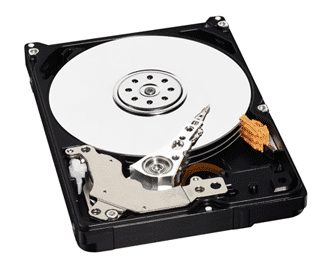
So, the kind folks at Western Digital heard my dilemma and donated a 640 GB Western Digital Scorpio Blue hard drive in order for me to perform the upgrade. My aging MacBook Pro is my life-blood that I use for both work and personal purposes, so making sure that I have ample hard drive space is critical to my success. I was happy to undertake the upgrade challenge and document the process for others to learn and attempt on their own.
Before I go into the “how to” part of this post, I just wanted to provide a bit of information about the Scorpio hard drives. There are two lines that you can consider, the Black, which is typically for high-performance situations and the Blue for larger capacity environments. For me, it was less about performance and more about the needed breathing room of space. Both drives boast features like low power consumption, being quiet and cool. The Scorpio Blue drives have 8MB Buffer sizes and have a rotation speed of 5200 RPM while the Scorpio Blacks have 16 MB Buffer and 7200 RPM. Thus far, having come from a Scorpio Black, I have not noticed any performance change. The drives have the following features:
- WhisperDrive – makes it very quiet
- ShockGuard – protects the drive mechanics and platter surfaces from shocks and bumps
- SecurePark – parks the drive heads during spin up/down and when the drive is off
- Free-fall sensor – detects if the drive is falling and auto-magically parks the head in less than 200 milliseconds (Scorpio Black only – optional)
Full specifications can be found on the Western Digital site (Blue and Black Scorpio versions).
Pre-Installation Process
Before you go blindly in and upgrade a hard drive, there are a series of steps you must take to ensure your success. I’m going to describe the process in my particular scenario (which may be similar to yours, but if it is different, feel free to leave a comment on this post with questions). Here is what I wanted to do and my environment:
- Replace a 320 GB Hard Drive with a 640 GB Drive
- Copy all of the contents of my Mac partition over to the new hard drive
- Copy over a Windows 7 installation on a Boot Camp partition
- Do it successfully! (GRIN)
If I wanted to simply clone my hard drive, that process would have been really simple. However, since I had a Boot Camp partition (40 GB in size), I wanted to also be able to have that available on my new hard drive. Here are the steps that I took to do all of the above.
Step 1 – Clone your Original Mac Volume/Partition
To do this, these are the steps that I follow and recommend.
- Get a Firewire hard drive enclosure for your new 2.5″ SATA hard drive (see Amazon) – recommend a FireWire one
for speed and to be able to boot from.
- Install your new hard drive into the enclosure.
- Use the Apple Disk Utility to do a Hard Drive Repair on the new hard drive. This will make it bootable. You may have to format the drive first.
- On your old hard drive, be sure to use the Apple Disk Utility to Repair Permissions as well as run a Disk Repair prior to cloning.
- Purchase SuperDuper! for the cloning process. I really can’t recommend this utility enough!
- Use SuperDuper! to clone your old hard drive on the new hard drive using the SmartUpdate option. This may take a few hours depending on how much needs to copy. I like doing a big cloning process overnight long before doing the actual upgrade and then do smaller updates to the clone right before the actual hard drive swap.
- Once you have done the full duplication to the new drive, be sure to test it out by booting from that Firewire drive. Simply reboot your Mac (with the Firewire drive attached) and hold the OPTION key. Then select your Firewire drive. If it boots ok, you should be good to go. If not, you may have to do the cloning process again, and/or run the Hard Drive Repair option.
Step 2 – Clone your Boot Camp Partition
If you are running Boot Camp, you will most likely want to move that over to the new drive as well. In order to do that, before you remove the old drive, you need to make an image of the Boot Camp partition. The easiest way that I have found to do this is to use WinClone (donation-ware). This was the first time that I had used this tool so I really didn’t know what to expect. A word of warning, it might not work for you so I encourage you to read through the FAQ and the support forums. However, in my case, I had 100% success and it was incredibly easy to do.
Here are the steps that I took:
- Boot into your Windows environment
- If your Boot Camp environment is in FAT32, you will want to convert it to NTFS. See the FAQs for info on how to do this.
- Run all of your Windows Updates
- Run a checkdisk to be sure that the integrity of your Windows install is good. Do that by entering “chkdsk /f /r” in a DOS prompt. You will have to reboot once back into your Windows environment and should see the Check Disk process running. Repair any errors you see there.
- Boot again into Windows and then defragment that disk (I used the internal Windows defragmenter)
- Shut down your Windows environment and reboot in OS X
Now that you have prepped your Windows instance for cloning, just fire up WinClone to start that process. When you first launch WinClone, you may have to install some additional tools. Just follow the prompts. Here is what I did:
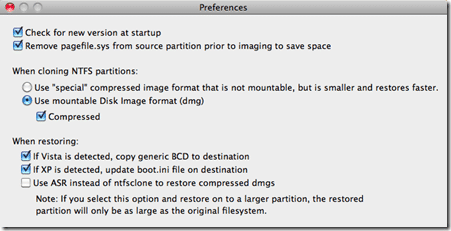
First, these are the settings that I used (default):
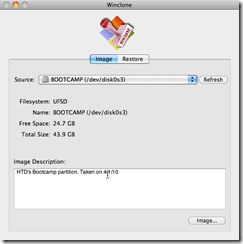
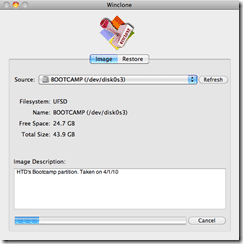
Then you select your Boot Camp partition and click “Image”…
You will be prompted for a location to save the image. I actually had to delete some files on my original hard drive so that I could save it on that drive. I wanted it to clone over to the new hard drive (later using SuperDuper!). Then the image creation process starts:
It actually didn’t take more than about 30 minutes for me to do a 40 GB partition that was a little more than 1/2 full.
Once the file is created, you are good to go!
Final Prep Prior to Install
Now you should have your new hard drive with a back up as well as an image of your Windows partition, so you are ready to do the final steps prior to cracking open your laptop. Here is what I did next:
- Turn off your wireless or disconnect your internet connection (I like doing that to be sure that my Mac doesn’t get any unseen updates behind the scenes during the backup process).
- Run SuperDuper! again using the Smart Update feature. This will ensure that your old and new hard drives are truly clones of each other. During this process, it will now copy over your Boot Camp image.
- Once the backup is complete, try booting one last time off of the FireWire (new) hard drive.
- If you successfully boot up with the new drive, you are ready to move forward.
Installing the new Hard Drive
Instead of listing out the process here, I have complied a video “how to” on the installation process. For the install, I used iFixIt.com’s guide which for me is the de facto installation how-to guide whenever I undertake upgrades like this.
You will need some tools like a #6 Torx screwdriver, a spudger and some small screwdrivers. Compressed air is good as well especially when you have your laptop open to clean out the dust.
Here is the install process:
I hope that you find this video helpful.
Post Hard Drive Installation Process
Hopefully you successfully installed the new hard drive. If you have questions about that or any other process, please leave a comment in the comments section. Once you have successfully rebooted with your new hard drive, the Mac OS may be a bit sluggish as it tries to figure out what is going one with all of the added space. This will eventually go away and your computer should perform just like your old one (e.g., with all of your Apps and data running the way they did previously).
The last step is setting up a new Boot Camp partition on the new drive. Here’s what I did:
- Launch the Boot Camp Assistant
- Create a new partition for Windows (I recommend if you can, do one slightly larger than your original one).
- Once the partition is created in the Assistant, you can simply close the Assistant as you don’t need to install Windows
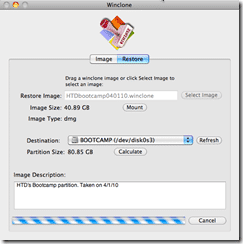
- Launch WinClone, choose your Boot Camp backup image that you made and select the new Boot Camp partition as the Destination:

- Go get some coffee or a beer or something because you are almost done and this process may take a while.
- Once it says (hopefully) that it was successful, try booting into your Windows Boot Camp.
WHEW! That’s it!
Summary
I realize that you must have nerves of steel to do all of this stuff. You have to simply not worry about making mistakes (well, you do have to be really careful though and read through all of the instructions and documentation). Chances are, if you aren’t familiar with any of this, you will run into problems. I have done this a few times so I was pretty confident (and lucky) this time.
There are LOTS of resources available to you on the internet. If you get stuck, ask for help (you can ask me on Twitter – @HighTechDad if you have questions). Also, many of the steps listed here can be used to upgrade other MacBooks/MacBook Pros. Just be sure your get the appropriate iFixit.com guide!
Disclosure Text : I have a material connection because I received a gift or sample of a product for consideration in preparing to write this content. I was/am not expected to return this item or gift after my review period. More information can be found in my About page as well as here.
HTD says: Most importantly, when you are doing things as complicated as a hard drive install…DON’T PANIC!
[amazonproduct=B002P3KO8I]
[amazonproduct=B001FBJJQ4]
[amazonproduct=B000NICEUI]


1 comment
hightechdad
Follow up note: You may have to go through Windows Activation again on your Boot Camp partition as Windows may detect hardware changes. This happened to me.