We have it pretty lucky nowadays. With smartphones and DSLR cameras, all of our photographs are already digital and easy to transport and store. But for those of us who span the digital camera and smartphone generation back into when we had to order “prints” of our photos from negatives, we all probably have boxes and boxes of photos stored somewhere. The product I’m reviewing in this article, the Epson FastFoto scanner (model FF-680W), is designed to not only scan those physical photographs but also enhance and optimize them, AND do this process at an unbelievably fast speed! (*Disclosure below.)
My wife and I have boxes and boxes of old photographs. Some of them are from our wedding. Others are from when our daughters were young (before we had the luxury of digital photos). And some are from way back in the past, when she and I were younger, or even from our parents’ time. We probably have nine boxes under our bed and 20+ albums of photos. The albums are great for flipping through pages with others, but the boxes of photos are a bit overwhelming.
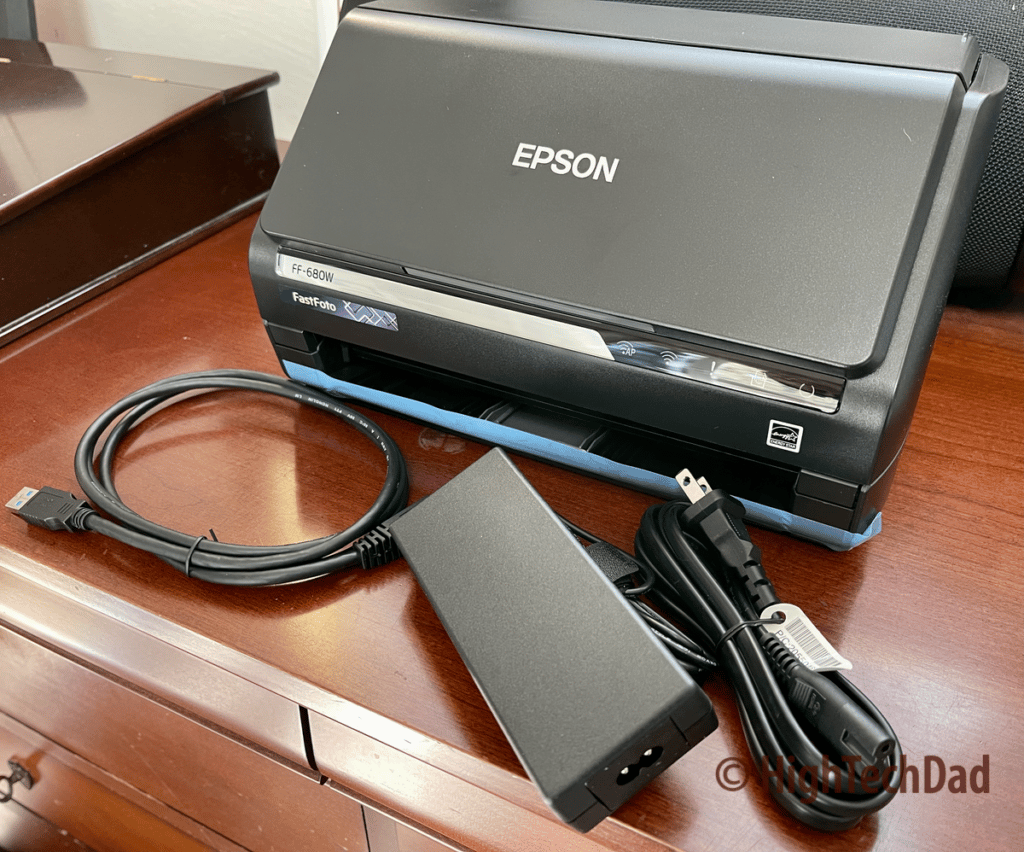
About two summers ago, we had to evacuate our home because of a nearby brush fine. One of the primary things we grabbed was the boxes of photos, but gathering them all together took time and space in our car. I wanted to find a better solution that was faster and more efficient. So when Epson asked me if I wanted to review the Epson FastFoto scanner, I was excited to do so! (Be sure to watch the video review that shows the Epson FastFoto in action!)
FastFoto – a fantastic suite of features
I have had (and reviewed) many scanners in the past. These often came as part of an all-in-one printing/scanner/fax product (see my highly-recommended review of the Epson EcoTank printer). While traditional business scanners are great, if your goal is to scan, optimize, enhance, and archive your old photos, you will want to have a scanner designed for just that.
And let’s face it, scanners, at least many of the ones in the past, really aren’t that fast. So, as I saw the name, FastFoto, I was intrigued by this Epson scanner. Is it really fast? And what else does it bring to the table? Would it make the project of digitizing all of those photos in the boxes and albums both easy and quick?
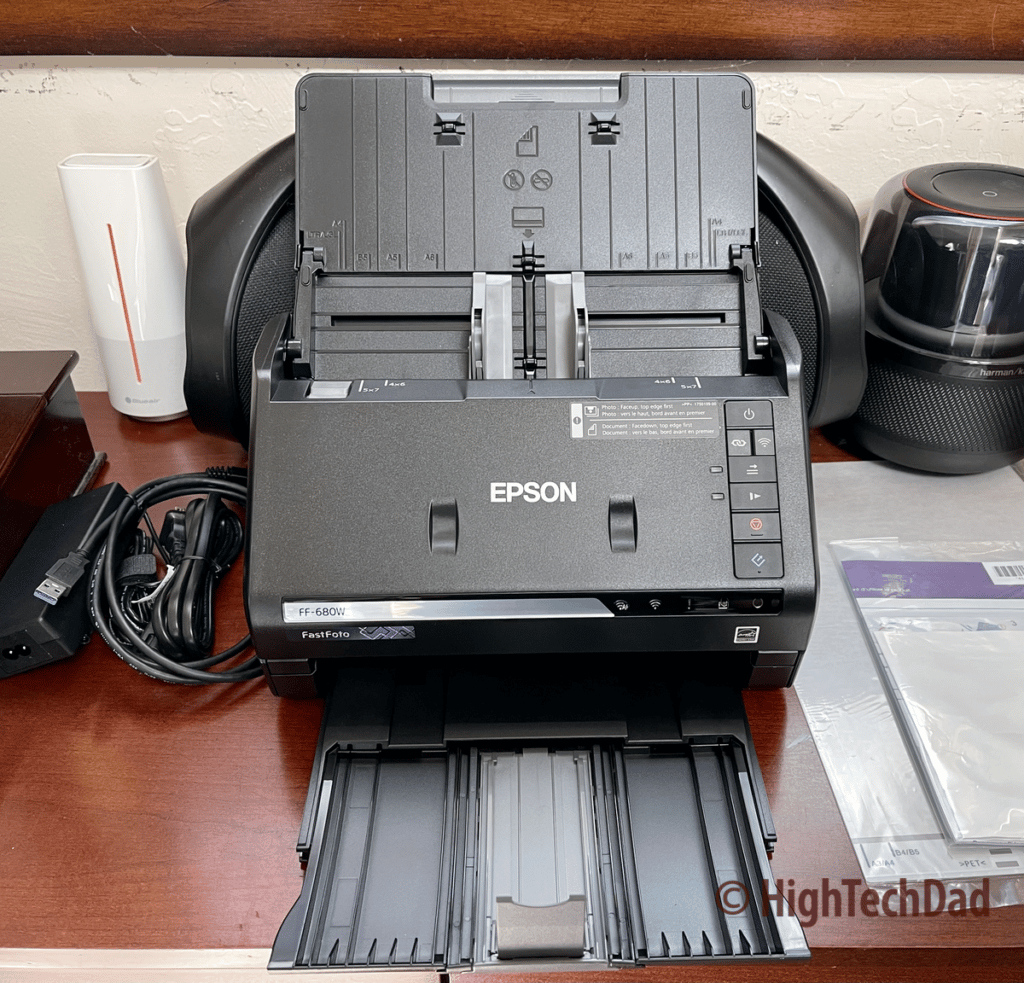
The short answer to that question is YES. It IS fast. And it is the perfect solution for what I was looking for.
Some of the features that I feel make this a great photo scanner:
- Multiple resolutions – scan at 300, 600, or 1200 DPI. For the fastest scans, choose the 300 DPI setting, and you can get good resolution for printing, sharing, and viewing.
- Fast scanning – as per the name, the Epson FastFoto can scan photos at about one photo per second at 300 DPI.
- Enhancements – the FastFoto can remove red-eye, enhance and balance colors, and correct colors.
- Scan in bulk – you can load up to 36 photos in one batch. And the photos can be of different sizes as well.
- Built-in organization – you can define the year, month, subject, and more to create the name of your scanned photos for easy identification later.
- Automatic 2-sided scanning – do you have photos that have writing on the back like dates, location, or the people in the photo? The FastFoto will automatically detect writing and include that in the scan in a single pass.
- Many photo types – the FastFoto scanner can accept a variety of photo types and formats – photos (even fragile ones), postcards, trading cards, documents, polaroids, and more.
- Cloud backups – while it is great to scan and have the images locally, a best practice is to have multiple locations for your backups. The FastFoto allows you to backup to Dropbox or Google Drive for additional security.
- Wired or Wireless connectivity – you can set up the Epson FastFoto scanner to connect directly to your computer via a USB-A connection or wireless (note: see the section below on the nuances of setting up a wireless connection).
The features I listed above are truly amazing and somewhat unique to the Epson FastFoto. Of course, you may find similar features in other scanners, but the FastFoto, in my mind, has been designed to truly focus on that process of scanning, enhancing, and archiving those physical photographs.
Features and how “fast” is fast?
I highly recommend you watch my video review below as I walk through not only some of the features mentioned above, but you also get to see how quickly a stack of old photos can be scanned and optimized. While the video is a bit long, it clearly shows the speed and features of the FastFoto.
As you can see in the video, the FastFoto scanner truly lives up to its name. However, you do have to remember that the higher the scan resolution, the longer the scan takes (and the larger the file size).
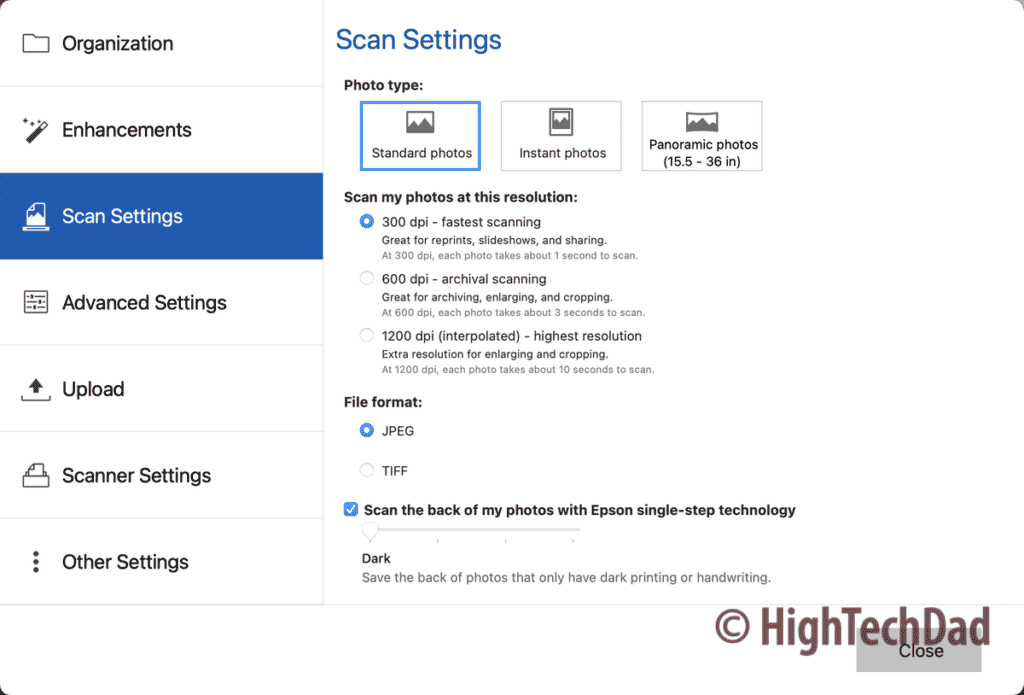
In the scan settings, you can choose that resolution as well as the file format and the type of photo you will be scanning. Each of these selections WILL affect the speed of the scan.
But one of the best settings is that of the automatic enhancements. Honestly, I don’t know why you wouldn’t have these configured for every scan, especially because the Epson FastFoto software will create TWO versions of your scan – the original and the enhanced version.
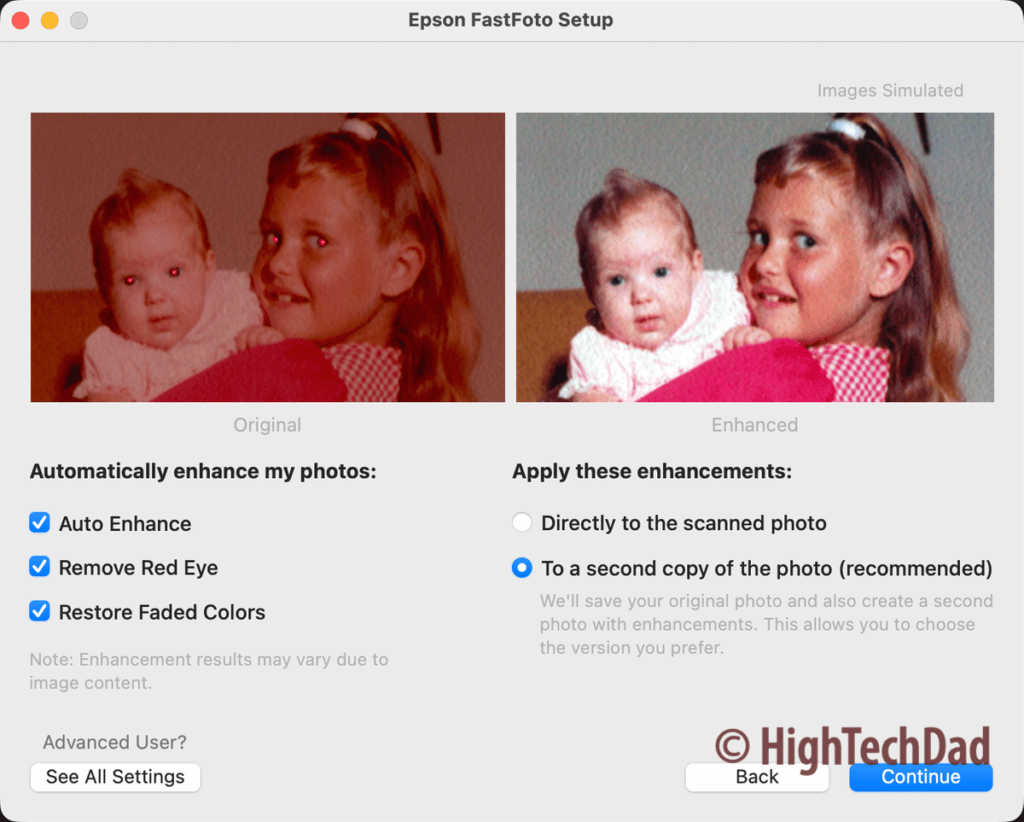
The key enhancements are Auto Enhance, Remove Red Eye, and Restore Faded Colors. Those three settings alone make a world of difference between the original and the optimized photos. And as I said, you can use either version as two scans are created.
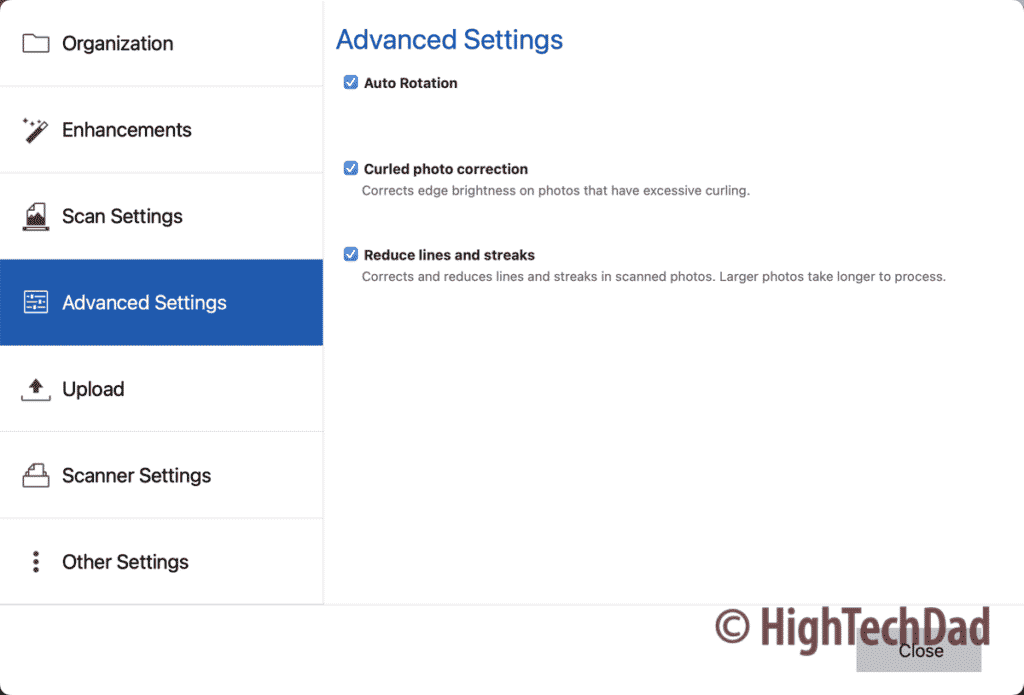
And, under the Advanced Settings, you have additional settings:
- Autorotations – so that your photos are always facing the proper orientation
- Curled photo correction – ensures that the bright edges on curled photos aren’t over-exposed
- Reduce lines and streaks – an additional level of correction to make the photos look “less scanned”
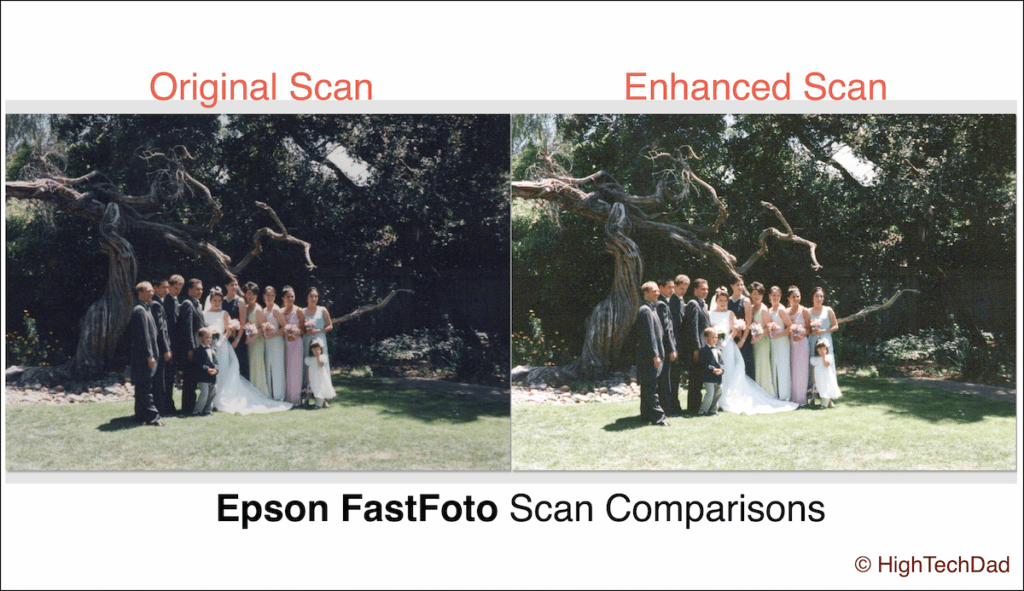
Below you can see the results of the enhancements. This photo is from my wife and my wedding (25 years ago). The colors have faded, and some dark-lit details are hard to see in the original scan. The FastFoto brought out more detail and made the colors much brighter.
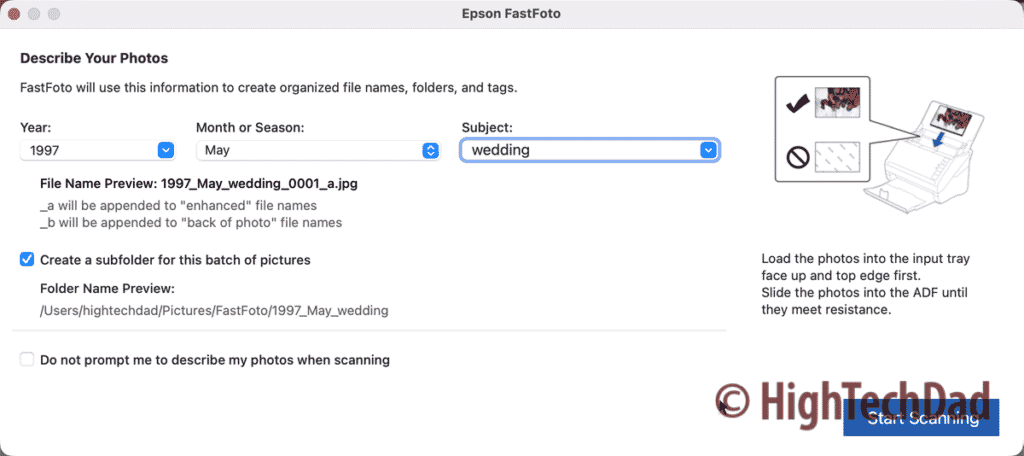
Another great feature is when you do the actual batch-scanning process. Typically (hopefully) you have your physical photos organized in some manner. For example, we have all of our wedding photos contained in specific boxes or albums.
When you start the batch, the Epson software prompts you for additional information that pre-pends to the file name so that later, when you are looking at your scanned image files, you can easily identify the groups of photos by the file names.
Also, the software provides an easy way to navigate through all of your scanned photos. Directly from the software, you can share, upload to the cloud, edit, or delete photos, as well as preview them within the software as well. You can also access the scanner settings if you are connected to the scanner.
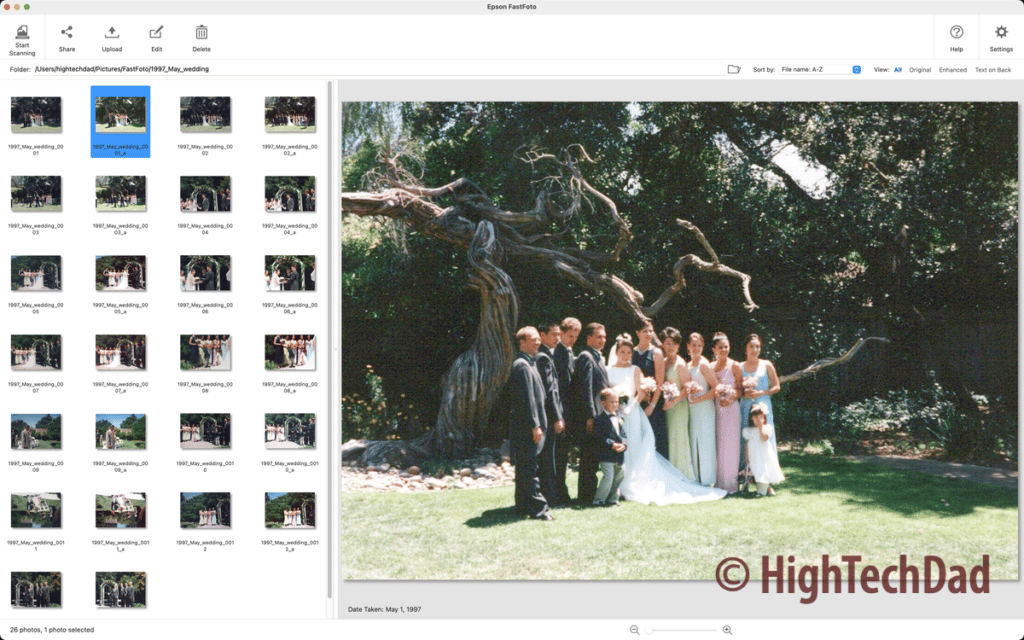
The software itself seems to be designed to keep things simple and easy to use. And that is what you want when you are doing batch scans. Of course, you can do individual scans with different settings if you want additional granularity (pun intended). But that is, obviously, a slower process.
Overall, I found the scanning to be quick and easy. Essentially, it became a “set it and forget it” type of process.
Setting up WiFi with the Epson FastFoto
In my video review, I talk about the WiFi setup and how it can be a bit tricky if you don’t have a WPS button on your wireless router. This took me a little while to figure out, so I wanted to document it for others in case they run into the same confusion.
The screenshots below represent me going through the setup again. I had already configured the scanner on the network, but you may want to do this type of thing again if you change your WiFi settings at any point.
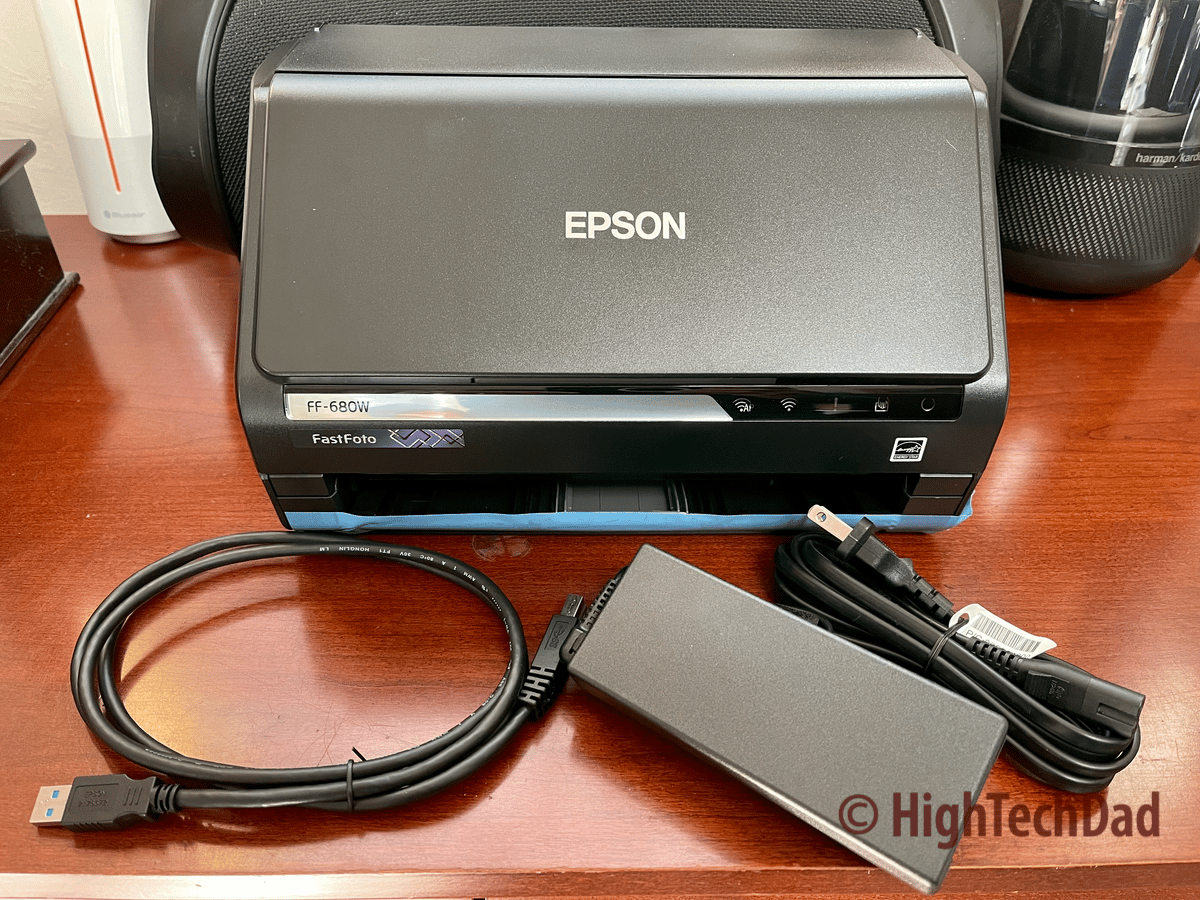
For the setup I’m describing below, you will want to use the (included) USB cable. And you will need to download the latest software and driver installation package from Epson. I don’t show the previous screens in the installation process. What is below are the items from the WiFi connection setup.
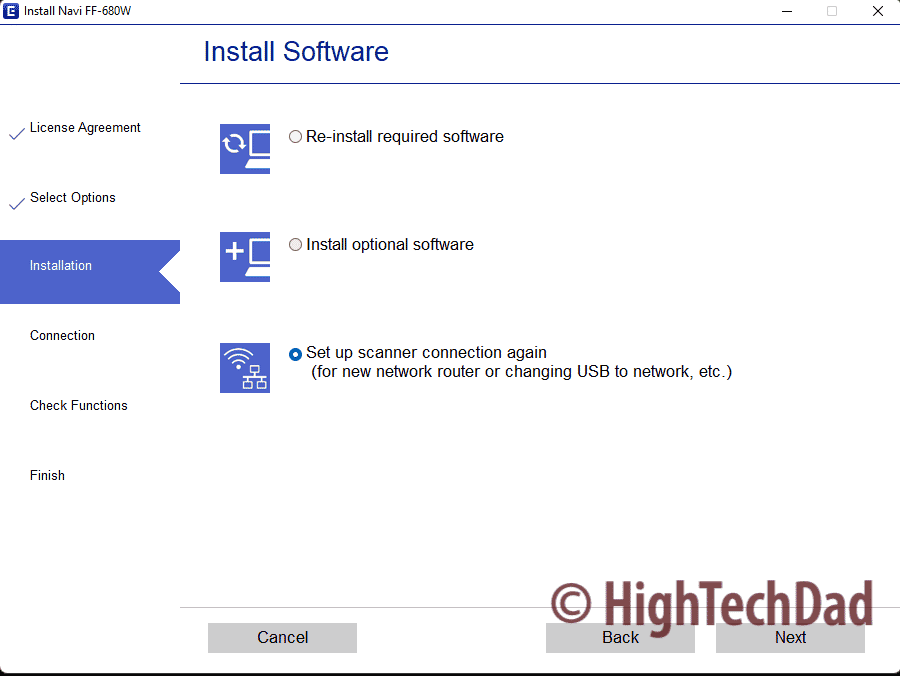
Choose the “Set up scanner connection again” from the options. Next, you choose the “Connect via wireless network (Wi-Fi)” if you are going to have your printer NOT directly connected to your computer via the USB cable.
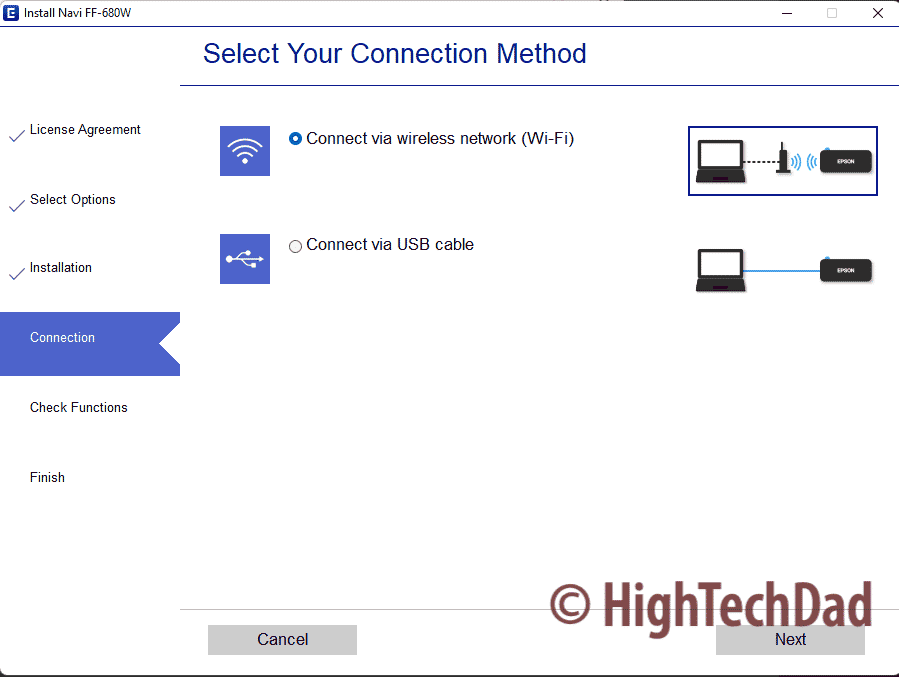
The next screen is where my confusion arose. I thought I was still in the process of choosing whether I wanted to do a USB (direct wired) connection or a wireless one. And since “WPS button” was the only option available for “wireless,” and I knew that my wireless router did NOT have a WPS button or that functionality, I thought I couldn’t set up a wireless connection.
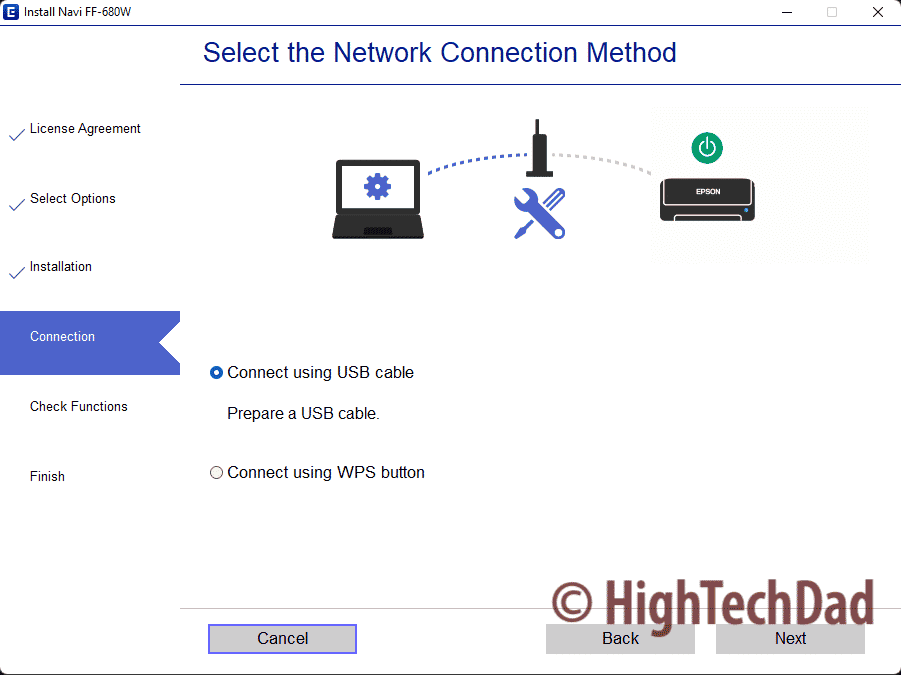
I was wrong. For those people who do NOT have a WPS button, you should actually choose the “Connect using USB cable” option. This will allow you to select the WiFi network you want via your computer and send it directly to the Epson FastFoto for the configuration. At this point, you will connect the USB cable.
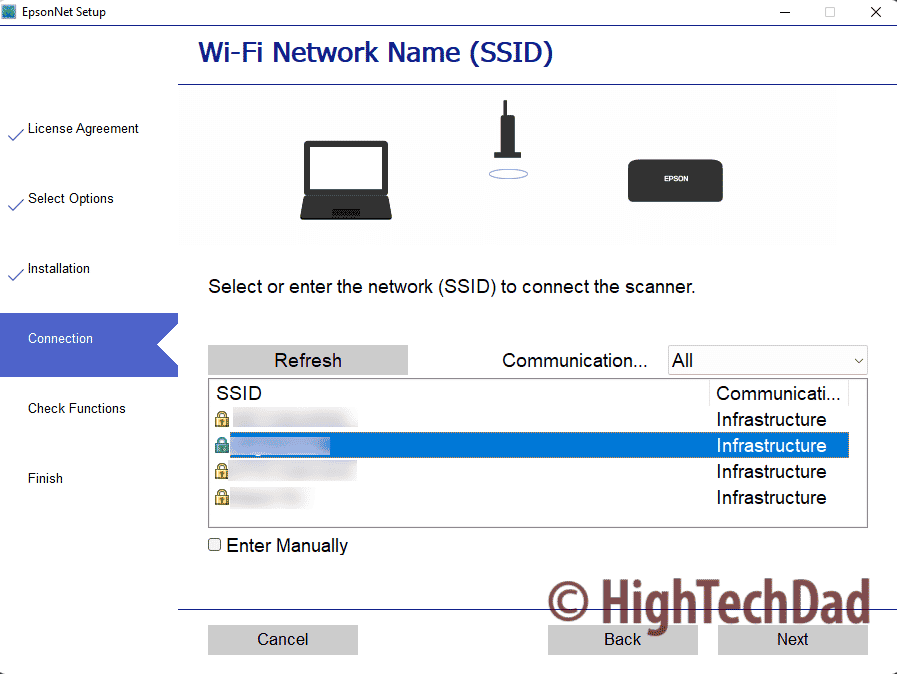
Once you choose your SSID (wireless network) and enter the password, it will be stored on the scanner. Then, you can place the FastFoto scanner anywhere it has access to your WiFi network and scan wirelessly to it from any computer (PC or Mac) that has the Epson software installed.
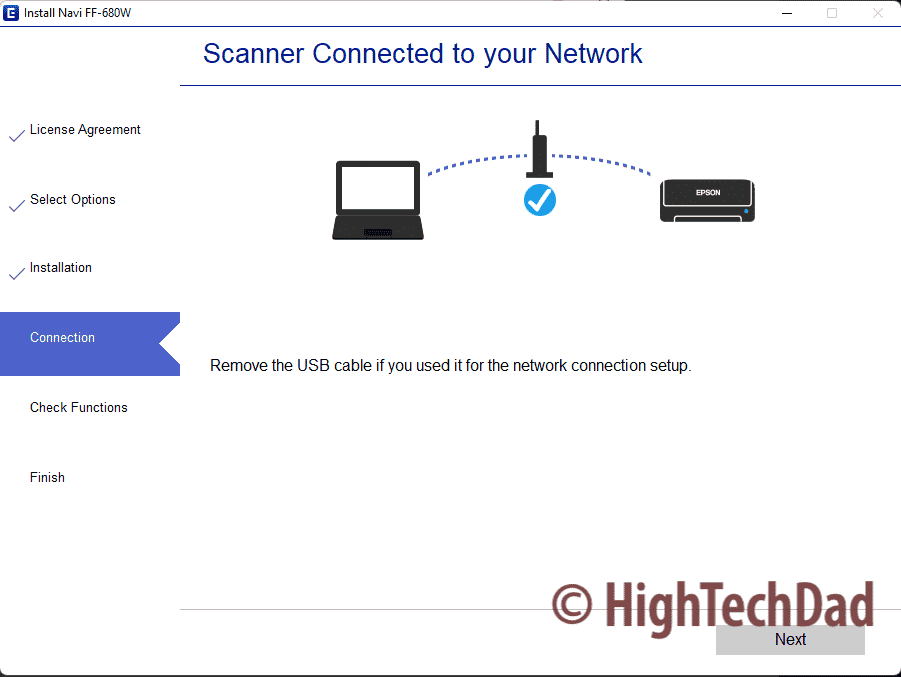
With that, you are done and you can remove the USB cable. Do note, you are allowed to “pair” the FastFoto with a single computer, so you may get a prompt like the one below.
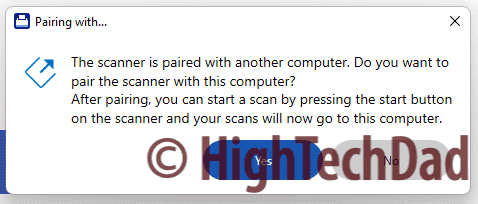
All this means is that you need to decide if you want to have a primary computer for managing all of your scanning. If you pair it with a computer, there is a button you can press on the scanner itself that will then automatically transfer the scans to that specific computer. This is not required, AND you can scan from any computer you have the Epson software installed on.
The price of speed and convenience
The Epson FastFoto scanner makes scanning, enhancing, organizing, and archiving physical photographs extremely easy. It’s very fast when set at the 300 DPI setting and will allow you to quickly batch process old photographs in just seconds.
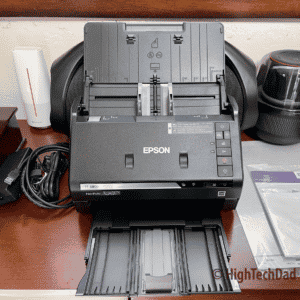
It handles a variety of sizes and picture formats and allows you to customize how you want things to be enhanced, if at all. It has a very compact size that is still capable of handling larger format prints due to its extendable trays.
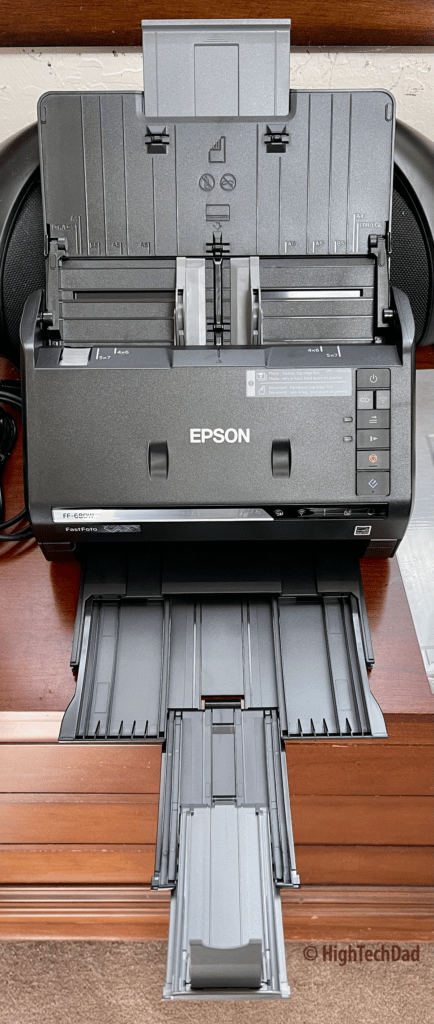
However, because of the advanced scanning capabilities and the software driving it, the Epson FastFoto scanner is a bit of an investment. This is not a budget scanner. But you probably would not want to have a “cheap” or sub-par or SLOW scanner to work through your precious physical memories.
You can currently get the Epson FastFoto scanner on Amazon for $499.99 (usually, it retails for $599.99). It is currently $499.99 on the Epson site as well.
Shop on HighTechDad.com
The product shown below (and related products that have been reviewed on HighTechDad) is available within the HighTechDad Shop. This review has all of the details about this particular product and you can order it directly by clicking on the Buy button or clicking on the image/title to view more. Be sure to review other products available in the HighTechDad Shop.
-
Product on sale
 Epson FastFoto Scanner FF-680WOriginal price was: $599.99.$499.99Current price is: $499.99.
If you are shopping for a fast scanner to enhance and batch-process your photos, the Epson FastFoto should definitely be on your list. I encourage you to look at their product pages to get more details on the specifications and other features. However, if you have questions, please be sure to leave a comment below.
Disclosure: I have a material connection because I received a sample of a product for consideration in preparing to review the product and write this content. I was/am not expected to return this item after my review period. All opinions within this article are my own and are typically not subject to editorial review from any 3rd party. Also, some of the links in the post above may be “affiliate” or “advertising” links. These may be automatically created or placed by me manually. This means if you click on the link and purchase the item (sometimes but not necessarily the product or service being reviewed), I will receive a small affiliate or advertising commission. More information can be found on my About page.
HTD says: Preserving your old photographs digital is an extremely important thing to do. But the process can be quite time consuming if you don’t have the proper hardware. The Epson FastFoto scanner can scan, enhance, optimize, and archive older photos in just seconds as a batch process.
HighTechDad Ratings
-
Ease-of-Use
-
Family-Friendly
-
Price Point
-
Features
Summary
Preserving your old photographs digital is an extremely important thing to do. But the process can be quite time consuming if you don’t have the proper hardware. The Epson FastFoto scanner can scan, enhance, optimize, and archive older photos in just seconds as a batch process. The setup of the Epson FastFoto is probably the most time-consuming. As mentioned, I got a bit confused when configuring the WiFi settings for the scanner but once it was completed, the actual usage of the scanner was amazing. It is quite easy to batch scan and enhance multiple photographs in just a few seconds. The optimization of the photos themselves works quite well, and the fact that it saves a copy of the un-enhanced photos is a great to have feature. While this isn’t a budget scanner, you will “save money” through the time and convenience of doing fast batch scanning.
Pros
- Very fast batch scanning (at 300 DPI setting)
- Great set-it-and-forget-it photo enhancement settings
- Automatically scans the back of the photos if there is writing
Cons
- A bit pricy
- Setup can be a bit confusing



9 comments
Candice Cain
I’ve spent hours trying to figure this out. I’m hoping someone can help me-Im running out of time! I’m not technically saavy but I did getting everything scanned into Fastfoto in different categories/files. These are recipes and I want to export them so I can make a simple cookbook. I did get 1 file to Dropbox. Do I need to go from Dropbox to some other program to put the recipes on ‘pages’?
I think part of my problem is I did the scanning on desktop. Can I get everything transfered to my tablet?
Any ideas? Thanks!
Richard
How is this scanner for document scanning? Once I am done with scanning my old photos, it will be used primarily as a document scanner – usually for business documents – or receipts.
Michael Scherotter
Does the scanner set the image file metadata date to the date that you specify or the date that the image was scanned?
Michael Sheehan
Great question, Michael. Honestly, I don’t know. I haven’t used the scanner in some time (need to carve out time to do some archiving) but I will try to look for that.
Sheryl Felice
God Bless you High Tech Dad:) Finally, you have answered my problem. My last Ff680w you were able to move from FF to Dropbox to IPhotos. I could send you a screen shot of the old software showing the iPhoto symbol. Same machine, different software:/. Now, I scan, go to Dropbox, highlight photos and pick send to photos. This took DAYS TO FIGURE OUT?
My new dilemma, my photos enhanced or not are too dark and out of order, what do I do?
Mark H
I already have the Epson software installed but need to configure the non-WPS Wi-Fi network still. Is there a way to do this if the software is installed already? I tried to uninstall and re-install but it completely skips over the ‘Connection’ portion of the installation and I’m left with just a USB-connected scanner
Sharene K Shank
What am I doing wrong? When scanning batches, the next batch scans to the beginning of the file rather than starting where the previous batch left off. I have way too many pictures to scan it all in one batch. Thoughts?
Liz
Thanks for the read. Very helpful. Is there anyway to save the photos to the photo library on a macbook air? or only to a drop box or google drive?
Michael Sheehan
Hey Liz! I haven’t tried that but I’m going to think that the way that the software is designed, you probably will have to export to a drive and then drag over to your Photo library. For the DropBox or Google Drive, if you have locally mounted those cloud storage drive, you could configure the app to export it to those specific drives.