Do you back up your Mac regularly? Best practices suggest you should have three types of backups: one always-on local, one local but moved off-site, and one fully remote (like a cloud backup). But how many of us follow this? I know I don’t. The closest I have gotten is to have the always-on local backup using Apple’s Time Machine as well as storing all of my docs on Microsoft OneDrive. Better than nothing I guess. But sometimes backups fail. And I recently had my Time Machine backup fail repeatedly. After some investigation, I figured out how to identify the culprit and then fix the issue. Here’s how I did it.
Apple’s Time Machine is a great, easy way to back up your Mac. It takes a “set it and forget it” type of approach. You designate the hard drive (typically an external HD or a NAS), and just let Time Machine do its magic. It works fantastically and gives you the ability to restore a file or a complete hard drive easily.
That is…until it doesn’t.
In this Fix It article, I’m going to walk through the process I took to investigate, troubleshoot, and eventually FIX my Time Machine backup errors. This is a bit of a journey. If you are having issues with your Time Machine backup, you may want to try some of these fixes. But each use case is different. Some things may fix it right away, and other times it may take a lot more work because your error might be different from mine.
Lastly, undertake this at your own risk. Doing something wrong could erase your backups, or worse, mess up your computer.
6/21/21 Update: If you are also using Microsoft OneDrive AND Time Machine, you will want to see my How To/Fix It article – they don’t always play nicely together!
Understanding Time Machine Errors – Not That Easy
My Time Machine backup had been humming along just fine. But then suddenly I started getting some error notifications saying that the Time Machine backup had failed.
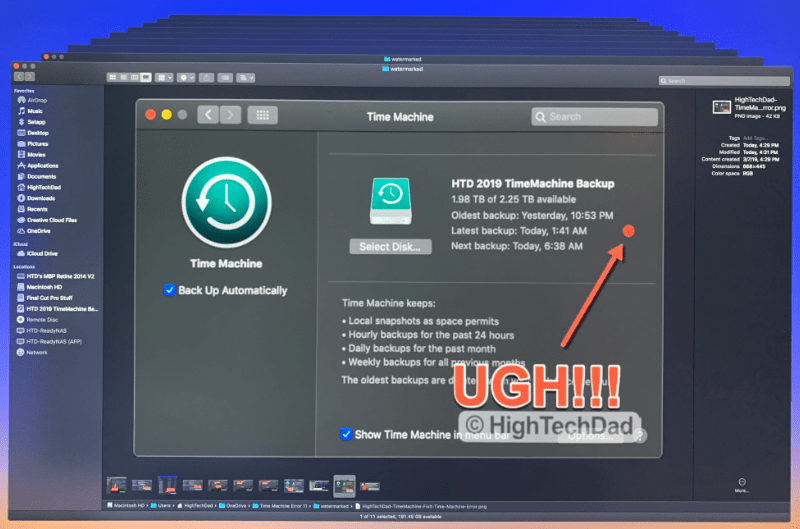
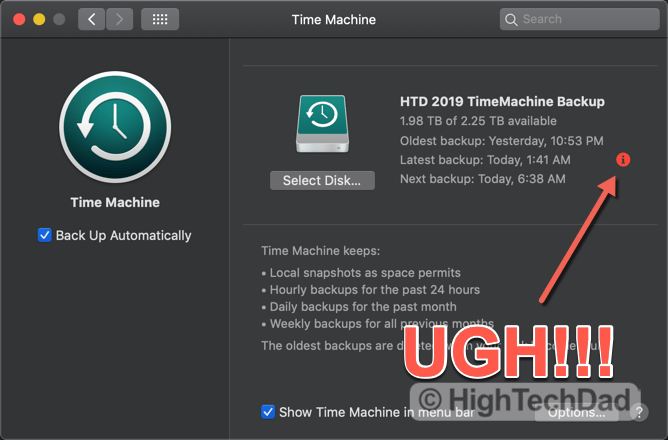
Within the Time Machine System Preference panel, there was a little red exclamation mark (to go along with the notification).
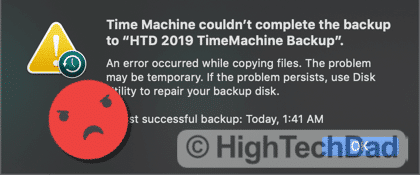
Clicking on that red exclamation mark gives a little bit more detail…but unfortunately not much more than that.
Mine simply read:
“Time Machine couldn’t complete the backup to [hard drive name]”
-My Mac
and then it went on to say:
“An error occurred while copying files. The problem may be temporary. If the problem persists, use Disk Utility to repair your backup disk.”
-My Mac
Repair Your Time Machine Using Disk Utility
Hmmm. Ok, that sounded relatively easy. Just run Disk Utility.
So I fired up Disk Utility and ran a Repair on the hard drive that contained my Time Machine backup. A quick word of warning here. Depending on how long you have been backing up to that hard drive, your Time Machine backup might be quite large…and complex. Which means, it may take a LONG time to run a repair.
Mine took almost 8 hours to run.
And it really didn’t find anything wrong. So back to the beginning.
I even tried doing the Repair booting from the Repair partition on my Mac. You do that by restarting your computer, and as it is restarting, hold down the “command R” keys. That will launch a special environment allowing you to reinstall MacOS or do repairs, among other things.
Well, I tried that process, and 8 hours later, the Repair process didn’t find any issues.
So I tried a Time Machine backup again. And it failed. Back to square one.
Remove the “.inProgress” Backup
The next thing that I tried was based on the assumption that something was “wrong” with the current backup process. If you use Time Machine, your Mac will continually store hidden files to be backed up (side note, that can take up precious space on your hard drive if you don’t regularly connect to your Time Machine hard drive).
Also, on the Time Machine hard drive, the system keeps an “InProgress” file since Time Machine essentially keeps incremental snapshots of points in time. The InProcess is the current snapshot.
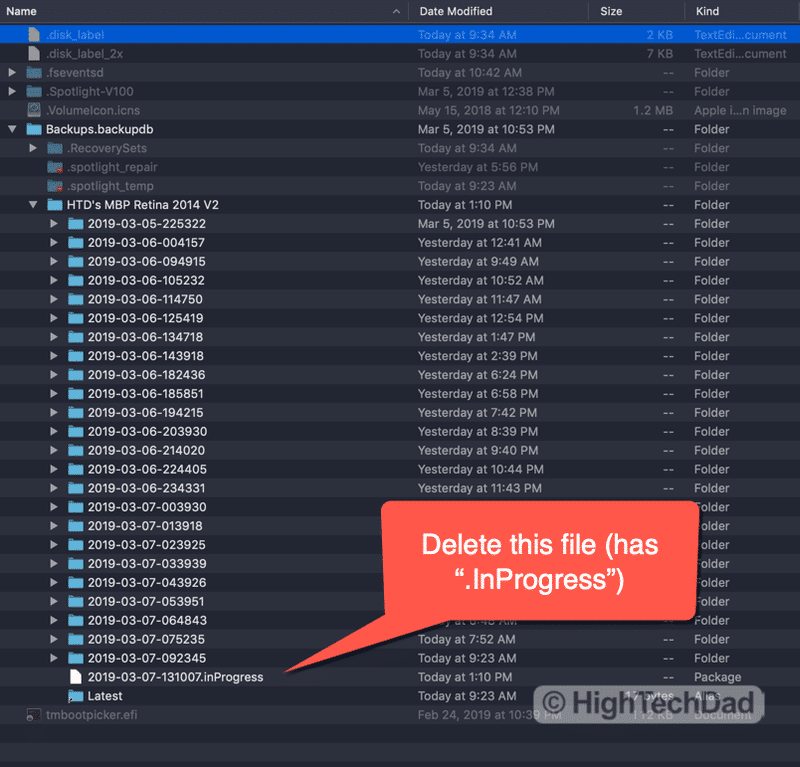
So, to ensure that there isn’t an issue with the current snapshot, you need to delete that InProgress file. Here’s how you do that.
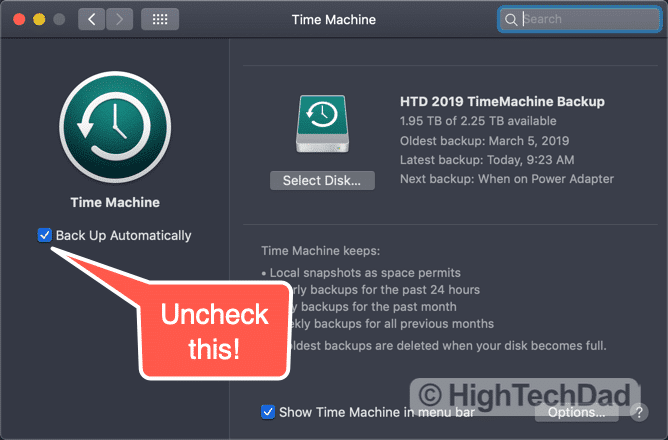
Go to System Preferences and turn off Time Machine (uncheck “Back Up Automatically”).
Next, go over to the hard drive that contains your backup and open it up and look for a folder called “Backups.backupdb” (or something similar). Inside that folder will be another folder that has the name of your Mac. (You may have multiple if you back up multiple Macs to the same hard drive.). Inside that directory will be all of your incremental backups which are date and time stamped. Look for the file that has “.inProgress” as part of the name.
Delete the .inProgress backup file and empty your trash. Then turn the Time Machine backups back on and start another backup.
Guess what, this didn’t help me. I still, after the backup ran for a while, got the same cryptic error.
Go Nuclear – Reformat the Back Up Drive
I have to say, this step is OPTIONAL! And after I fixed my Time Machine back up issue, I realized that I probably didn’t need to do this. But, for documentation purposes, I thought I would include it.
The big factor here was, I realized I didn’t need my historical Time Machine information. My computer was running fine. All of my critical files were stored on OneDrive. So I thought I should just completely reformat my Time Machine hard drive and start from scratch.
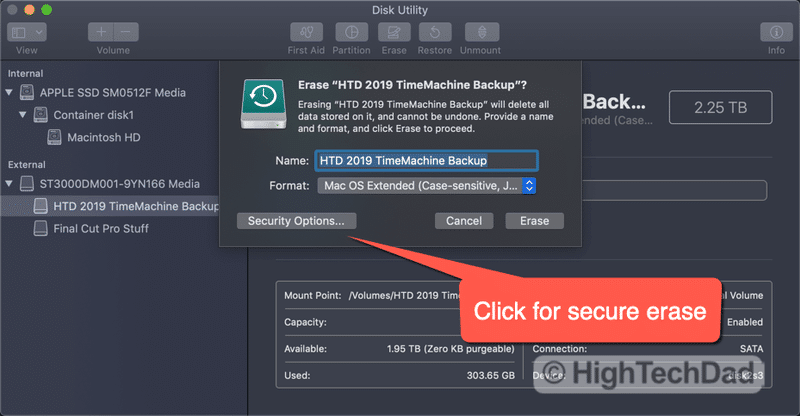
So, using Disk Utility, I selected the Time Machine hard drive and chose “Erase.” I did a quick format.
I tried the Time Machine backup process again using the newly formatted hard drive.
Guess what, it failed again.
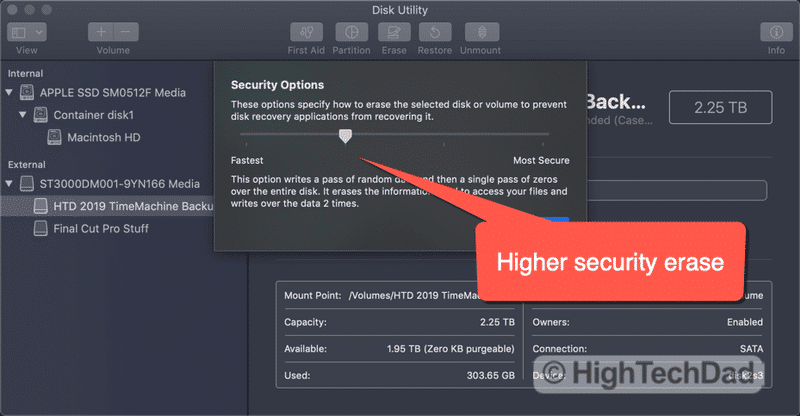
So I thought, maybe there is a bad sector on the hard drive (it is partitioned, but that’s another subject altogether). I decided I would reformat the Time Machine hard drive again, this type using a more secure wipe.
With a secure wipe, a bunch of zeros are essentially written down on the hard drive to prevent the recovery of data. But the other nice thing about writing zeros is that it supposedly also will identify bad blocks or sectors on the hard drive. Also, after reading some other comments, I decided to format it as Mac OS Extended (Case-sensitive, Journaled).
Long story short (and, the secure erasing is a LONG process as well), after doing the erasing…my Time Machine was still failing.
Ugh.
The Details Are What Fixed the Time Machine Issue
At this point, I realized I was operating entirely in the dark. I was troubleshooting without really knowing anything. Not really smart.
So, I decided to dive into the details…to see what the error was, and then go from there.
Luckily, if you want to get into the details on the Mac, you can. You just kind of need to know what you are looking for.
I hope I can guide you with this.
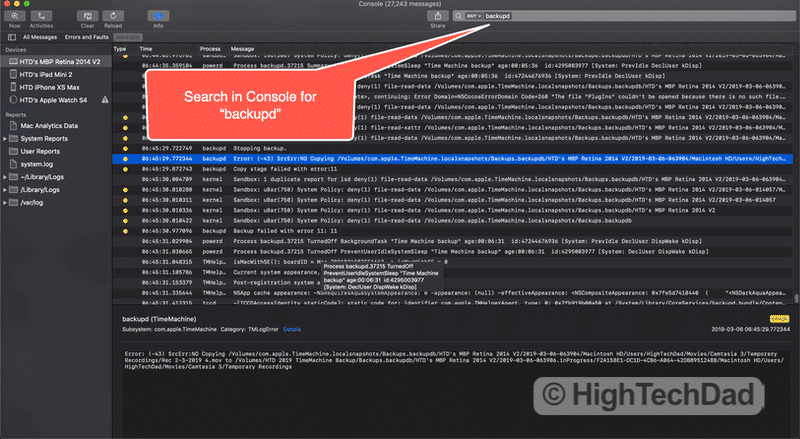
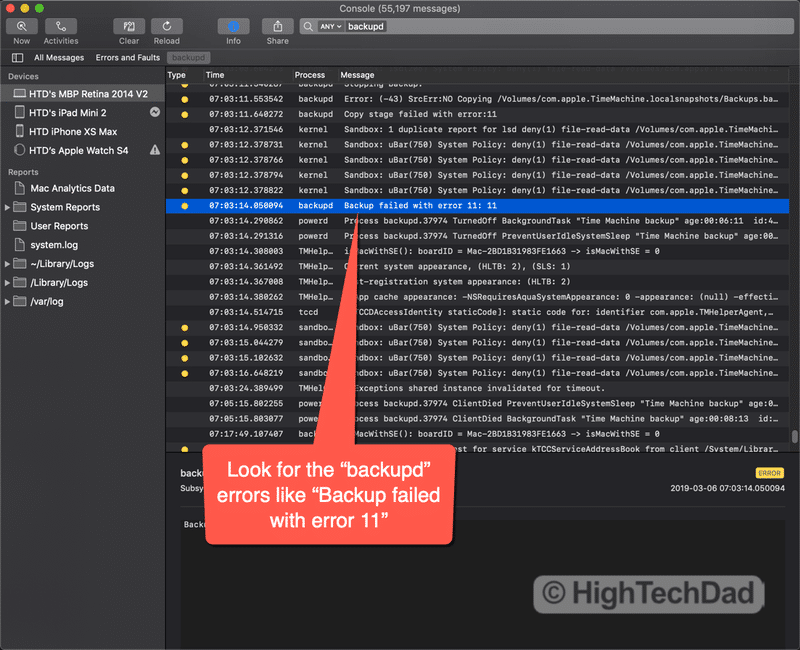
There is an app called Console which resides in your Applications > Utilities folder. Launch that.
In the search bar, type in “backupd” (note: there is a “d” after the word “backup” and then search.
What this does is essentially search through all of the log files on your mac for anything related to the “backupd” process (which is essentially Time Machine).
And you may want to:
- launch Console,
- search for “backupd”,
- start a Time Machine backup,
- wait until the Time Machine backup fails, and then
- start digging through the Console search results looking for errors.
Here’s what you need to look for (and how I discovered it was a Type 11 – whatever that is – error). Under the Process column, look for “backupd” and under the Message column, look for something similar to “Backup failed with error 11.”
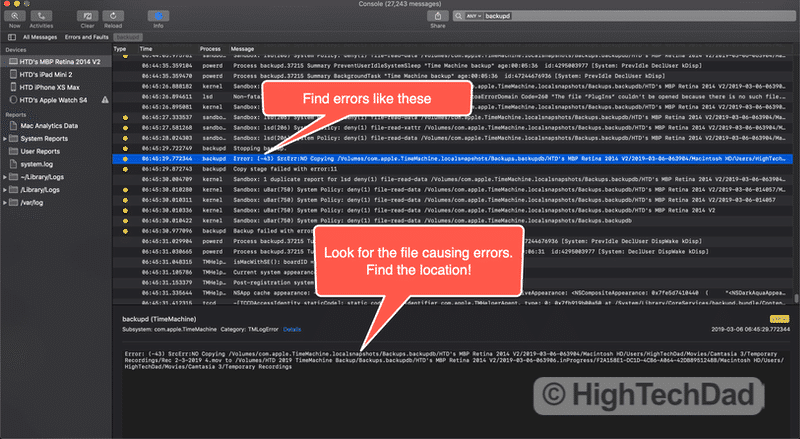
Once you find that error. Look a bit earlier in the error log for another “backupd” event.
I found one that said “Error: (-43) SrcError:NO Copying” and it then listed out a long path to a particular file.
FOLLOW that file path and go to that file. It could be the thing that is causing your issue.
In my case, it was one of a few files that were causing issues. Mine were temporary files from a Camtasia recording that were supposed to have been removed automatically after a couple of weeks. As I tried to launch them, I got a strange error (even though they were temporary movie files). Once I relaunched Camtasia, those files were deleted.
I ran Time Machine again. This time, the backup went a lot longer. But, it still failed.
I used the same process I listed above, and identified another file (not really sure why it was corrupted) but after looking at it, I decided I could just delete that file.
I ran Time Machine again. It worked!
And for the past few days, my Time Machine has been running flawlessly (knock on wood).
Still Having Time Machine Issues?
I’m sorry to say that there are a lot of things that could go wrong with your backup. Too many to list in this article. I do know that from my research, the error I had was a pretty common one. Remember that Google is your friend. As is discussing with others. If you have other issues, leave a comment and ask questions.
Here are a few other resources that I found during my research:
- What to do when mobile Time Machine backups linger and fill storage space
- How to delete Time Machine snapshots on your Mac
- Time Machine unable to make backups in macOS Mojave [unofficial fix]
- Fixing a simple Time Machine error
Anyway, I do hope that my long ramblings here helped you fix your Time Machine error, or at least understand how to go about troubleshooting. Remember, having a broken backup system is only slightly better than having no backups at all!
HTD says: Apple’s Time Machine is a fantastic and easy way to keep regular, automated backups of your Mac. But when you run into issues, you need to fix them right away. Luckily, you aren’t alone, and a fix is available.


6 comments
Helios
Brilliant and well articulated article, helped me immensely – Thank You
Wayne Thurman
Your instructions to use “Console” solved my problem, though you are right that it takes some diligence. It took two iterations to find the problem files that had to be cleared up, but that allowed backups to resume. Thanks for your help!
Bill Hicks
This has been the best advice i have come across. There was a font file i downloaded that was somehow making my time machine crap itself. I located the file using the above method and worked!!
Keith
Thx for sharing. Patience watching Console paid off, as I am getting image files with [Error: -36] copy failure.
This error is a weird one, but resolved by moving the files out-of-harms-way
Thx again
George Hartogensis
My time machine was crapping out and I went through all of the pain outlined here. After having established that the problem was definitely in my system, and not hardware, I finally a reference to /Volumes/Recovery in my logs, thanks to the the instructions herein. I Took a look and found a partition mounted to /Volumes/Recovery. I unmounted it and ran Time Machine and it works. For those of you who do not know how to do this, run the following commands:
$ df -h ### This will show what is mounted. Run when Time Machine is not running.
### If ?volumes/Recovery comes up the run the following command:
$ sudo umount /Volumes/Recovery
Good luck!
.
Michael Sheehan
Very cool! Thank you for sharing this.