Yesterday I received a panicked call from one of my daughters – “Daddy, my iPhone’s home button is broken!” Tears and wailing ensued. But, as with any broken gadget, I was up for the challenge, knowing that I could either replace the iPhone home button myself or figure out some other way to breath a few extra days or weeks of life into her iPhone 4 so that she could still use it. As it turned out, the “temporary” fix (which could be permanent), it quite easy to do and actually a pretty neat function that not too many people know about. And, it’s built into all iOS devices.

Normally, when hardware components fail on my iOS devices, I turn to the super-handy iFixIt.com guides. I have done anything from replacing batteries on iPhone 3GS & iPhone 4’s to replacing the power button on an iPhone 4 (let me tell you, THAT one is really hard!). So, I quickly scanned through the steps in the iFixIt guide and realized that even though the part itself was about $15 only, the level of effort to physically replace the button was HUGE. (Here’s the daunting fix-it guide.) So, I needed to find another solution.
Luckily, I remembered in the past reading about how you can reassign a button or create a gesture on a jailbroken phone so I knew there was a software solution out there. However, I didn’t want to jailbreak my daughter’s iPhone. There had to be another solution. And then I found it. What follows are the quick and easy steps on how to fix a broken iPhone home button.
How To Fix a Broken iPhone Home Button
Because the iPhone’s home button is probably the most used “moving part” of the iPhone, it is prone to wearing out or having a connector dislodged. Over time, it will break. Most people upgrade their phones though and never experience the breakage. But in case you do, here are the simple steps to enable a software-based home button (that actually has quite a bit of other functionality)…all for free and without having to jailbreak your phone. And this fix can be used with not only iPhones, but also iPod Touches and iPads.
Step 1 – Go into your iOS Settings
Open your Settings app on your iOS device and navigate to Settings > General > Accessibility
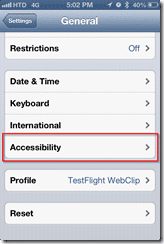
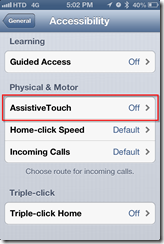
Step 2 – Within “Accessibility,” Open “AssistiveTouch”
There are lots of configuration settings within the Accessibility section. Normally, one would use Accessibility if you have impaired vision and want additional options to be able to use your iOS device, but as I learned, there are other things you can do in this section.
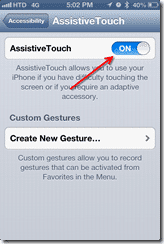
Step 3 – Turn on “AssistiveTouch”
Normally, this is defaulted to “Off.” Turn it on.
Step 4 – You are DONE! Use the soft-button!
That’s pretty much it. When you enable AssistiveTouch, suddenly a “button” appears on the screen.
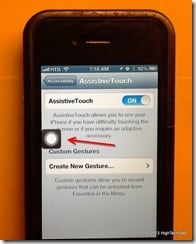
When AssistiveTouch is enabled, this button floats on each and every screen, even on the lock-screen. After a few seconds, it dims out so you can read text behind it. You can also move the button around by simply clicking and holding it. Below, I moved it to a different edge (it docks automatically to the edge of your screen) and it is dimmed out.
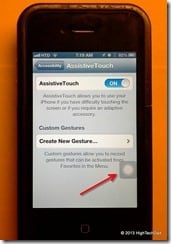
And guess what? Your new “Home” button is now available!
Commands built into AssistiveTouch
This little floating software button actually has a lot of great commands built into it. When you click on it, you get the first level of essential command, and this is where you get the new “Home” button:
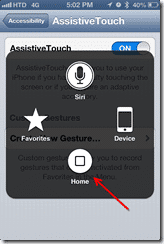
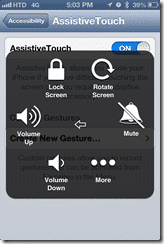
You can use this software-based home button just as you would normally use the hardware-based one (and this is what made my daughter quite happy). If you have a Siri-enabled phone, you even have the Siri icon, as well as access to your Favorites (which are actually gestures that you can record for certain tasks). If you click on the “Device” icon, you get access to items that are traditionally hardware buttons or toggles like volume, muting or locking the screen.
Clicking on the “More” icon takes you to a few more items like Gestures, being able to take a Screenshot, launching the Multitasking section or simulating a “shake.”
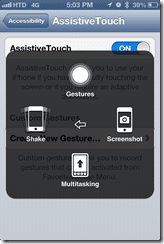
You can always click the arrow icon to go back a screen but if you don’t touch anything within the AssistiveTouch screen, it will automatically minimize back to the side of the screen.
So before you throw your iPhone out the window if your physical Home button breaks, or you pay someone to fix it, or you just go an buy another iPhone, be sure to try this fix. It’s pretty darn handy and has some additional helpful functionality built right in. For me, it let my daughter get a few more days until we go and get a new iPhone 4 (for $0.99 – a deal that I have seen floating around since the iPhone 4S and 5 are already out – old generation iPhones are inexpensive now!)
HTD says: It’s fun fixing a hardware-based problem with a simple and free software-based solution!


2 comments
Eli
Very nice, thanks for the info!
Smita Sharma
Great tips with picturization. Thanks for sharing.