
I’m such a heavy user of my Apple iPhones that it really seems like about a year after I get one, I’m doing a how-to article on replacing the iPhone’s battery. I now have an iPhone 4S and this past weekend, I replaced the battery. Other smartphone users may scoff at the fact that Apple has made their hardware quite proprietary (e.g., a closed design). Actually, it seems to me that Apple has actually now made it much easier to replace the iPhone 4S battery, especially in comparison to the iPhone 4 and iPhone 3GS process. This article (and video) shows you how to replace an Apple iPhone 4S Battery.
WARNING: Before I go into this How-to, I do need to emphasize that this processes is risky. For starters, it WILL void your warranty, especially if you mess something up in the process. Also, there are lots and lots of tiny screws and pieces that are incredibly easy to lose, break or knock loose. If you don’t take time reviewing the installation process, you could seriously damage to your iPhone 4S. You should only undertake this process if you feel like you know what you are doing and promise to not hold me responsible for anything bad that may happen to your device. Anything good that does happen, I’m happy to be responsible for that! And don’t drink any coffee before trying any repairs!
With all the disclaimers aside now, let’s take a look at the process. It is, actually, quite easy but be sure to watch the video below as I did actually almost screw something up. But as of this writing, my iPhone 4S is quite happy with its replacement battery.
The Tools
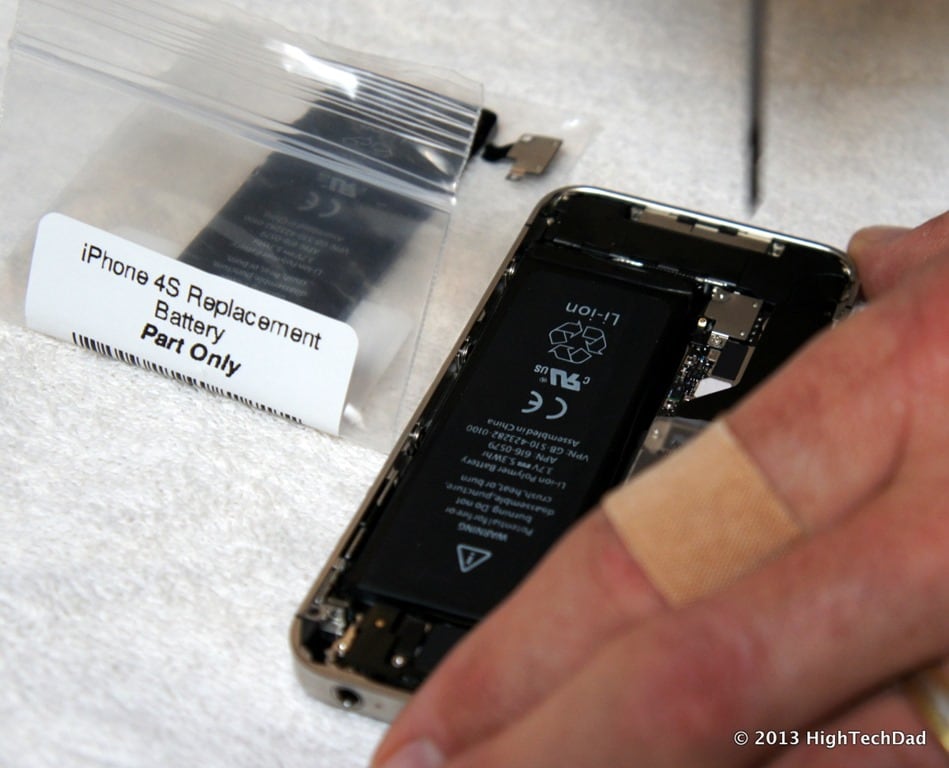
Before I get started, I first have to once again thank the kind folks at iFixit.com who supplied me with the replacement battery for the iPhone 4S. Also, without their helpful installation guide, I probably would not have attempted this replacement process. Oh, and don’t try to get one of those super cheap replacement batteries. These batteries have firmware and if you have an “incompatible” battery, your iPhone may have issues. Buy your battery from a reputable source (like iFixit.com).
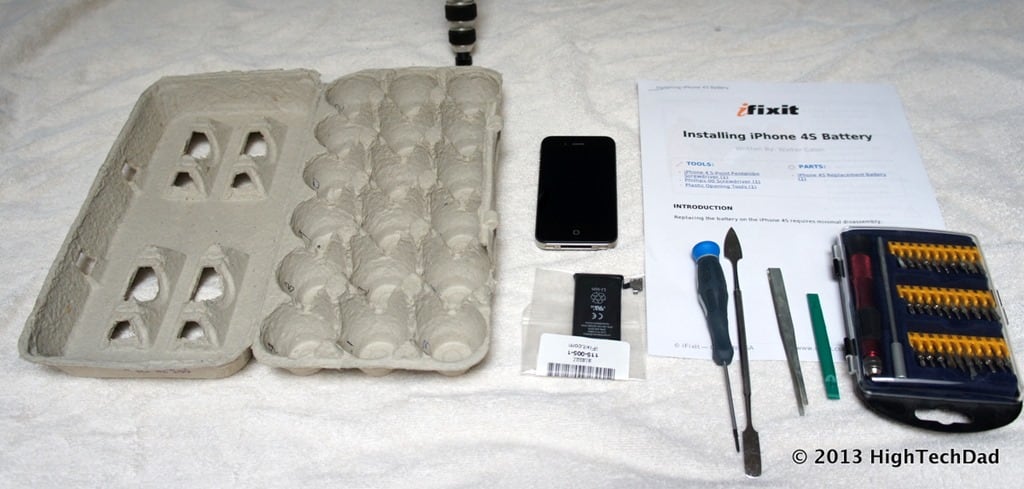
Here’s what I used for my installation process:
- iFixit.com iPhone 4S battery installation guide – print this out!
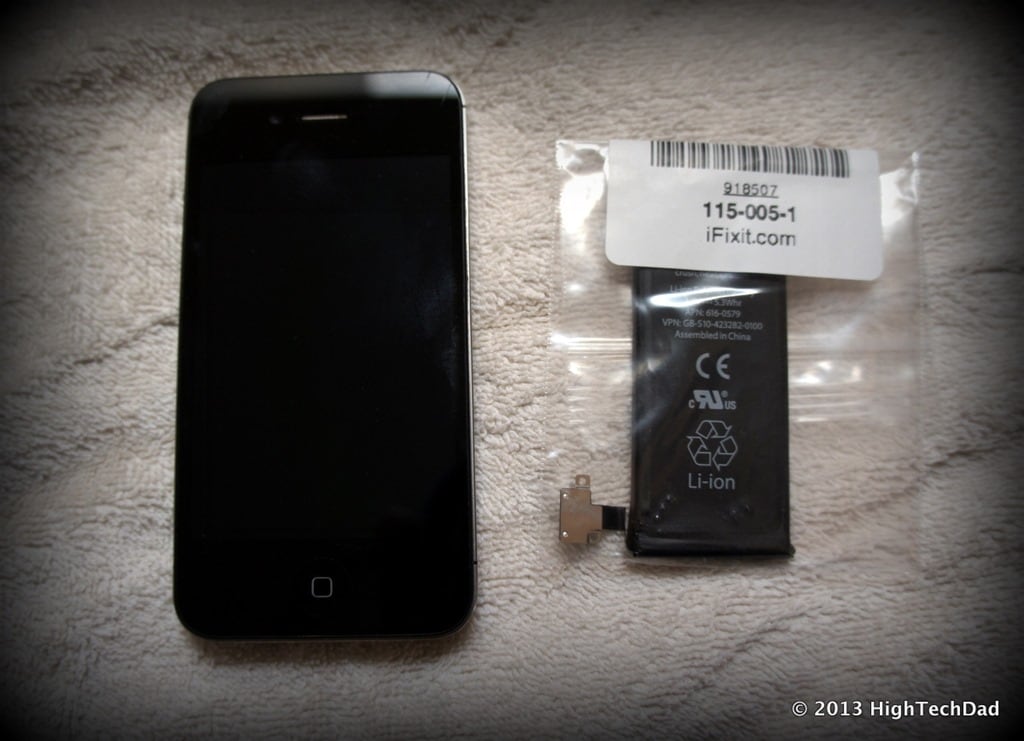
- iFixit.com replacement battery – get a battery from a reputable seller.
- Soft towel – helps pad your iPhone during the process and keep track of parts that fall or pop out.
- #00 Phillips screwdriver – helps to have one with a magnetic head.
- (If needed) Pentalope screwdriver – iFixit sells a kit called the Liberation kit (only if you don’t have Phillips head screws holding the case together).
- Spudger – I recommend a metal one but if you have a hard plastic one, it might work ok.
- Tweezers – the screws are very tiny so be sure you have a good set of tweezers.
- Needlenose pliers – also very helpful in picking up small screws or grabbing other parts.
- Egg carton – this is my own invention. Number each compartment and label on the instructions which screws are in which compartment.
The replacement battery isn’t that expensive, usually around $30. The other tools are pretty inexpensive as well and worth getting for other repairs.
The Battery Removal and Install
As I mentioned, the process for removing and installing an iPhone 4S battery is relatively easy, especially compared to earlier versions of the iPhone. I think that the great folks at the Apple Genius bars may have complained about how hard earlier versions were. Now, the battery replacement process is very straight forward. In fact, there are a total of 4 screws (only) that you have to remove.
I recommend reading through these steps as well as watching my video below. The video is a bit long, simply because I received some comments on previous install videos that said I didn’t show the complete process. So, the video below represents my install procedure, with limited edits (only a few to keep it somewhat short). And do note, at one point, a part does pop off unexpectedly (something that probably WILL happen with you). It’s the battery grounding clip that is anchored by one of the screws that you remove. So be sure to watch the video to know how to put it back in properly. You could damage your iPhone if you don’t put it back or install it improperly.
The How To video below is also available directly on my YouTube channel:
[youtube http://youtu.be/RW8RSA51VlY]
I also recommend that you print out the iFixit guide and have it handy on a computer screen so that you can zoom in on the pictures. Here are the high-level steps.
Step 1 – Back up your iPhone
Seriously. Do this before you do anything else! ‘Nuf said.
Step 2 – Power down your iPhone
If you don’t do this step, you may have a “shocking” experience or cause some damage.
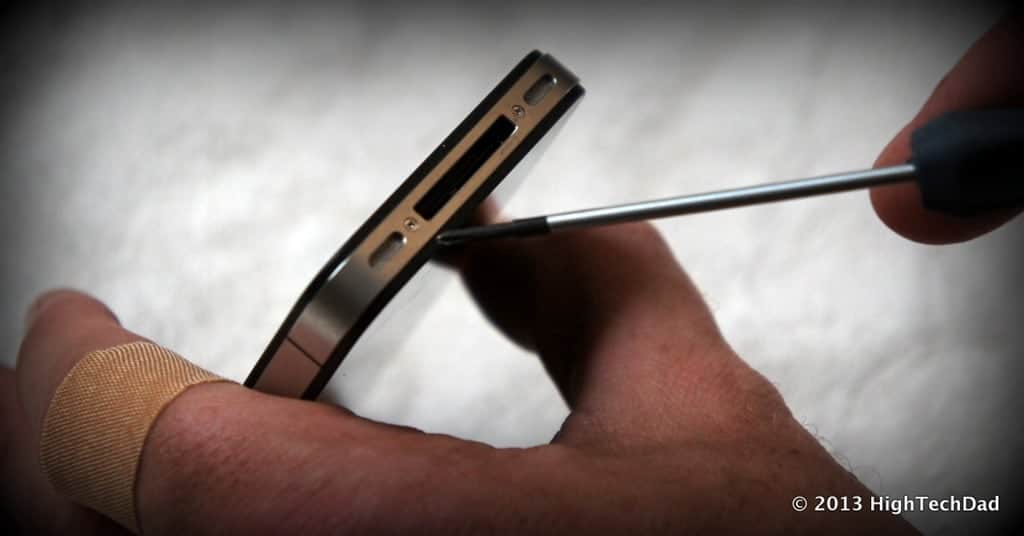
Step 3 – Remove the rear panel screws
Your iPhone 4S may or may not have pentalobe screws. If it does, use the special pentalobe screwdriver. If you have Phillips head screws, lucky you! You can use a standard #00 Phillips head screwdriver. Unscrew those two screws and save them in your appropriately labeled egg carton compartment.
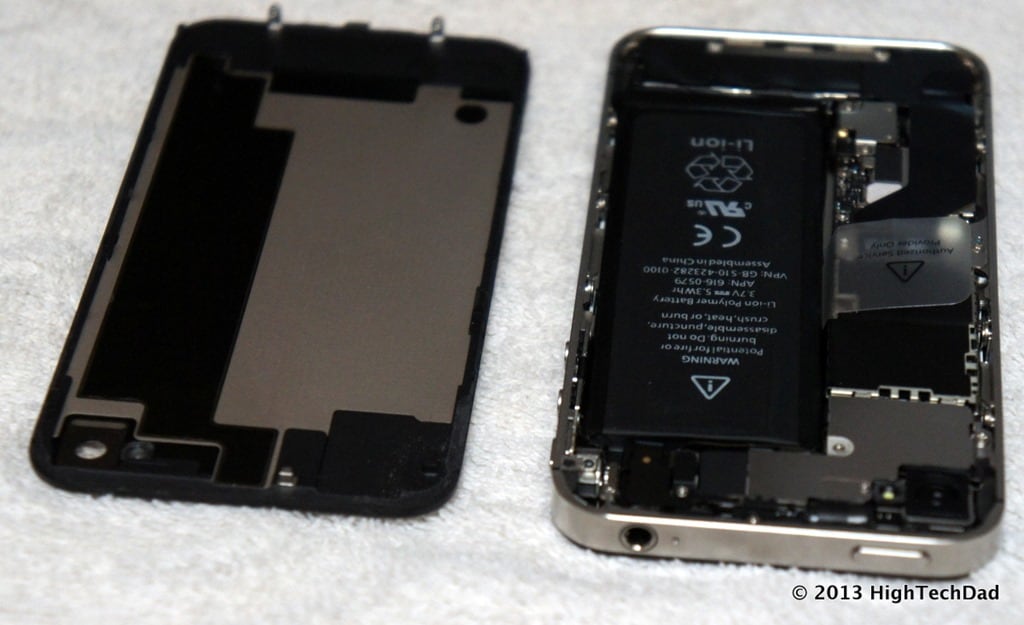
Step 4 – Slide the rear panel up slightly & remove
Flip your iPhone over and slide the back up. It should move 1-2 mm. You simply press down and slide up toward the top of the iPhone. Once it slides up, you can remove the back panel and set it aside.
Step 5 – Remove 2 Phillips screws
Next you need to remove two different sized Phillips screws. Note, these screws are not the same size. First remove the longer one (1.7 mm) towards the bottom of the iPhone. Store that in the 2nd egg carton compartment. Then remove the shorter (1.5 mm) screw. BE CAREFUL with this step as there is the small, black grounding clip that is attached to it. (Mine popped off in the install process.) Store this smaller screw in the 3rd egg carton compartment.
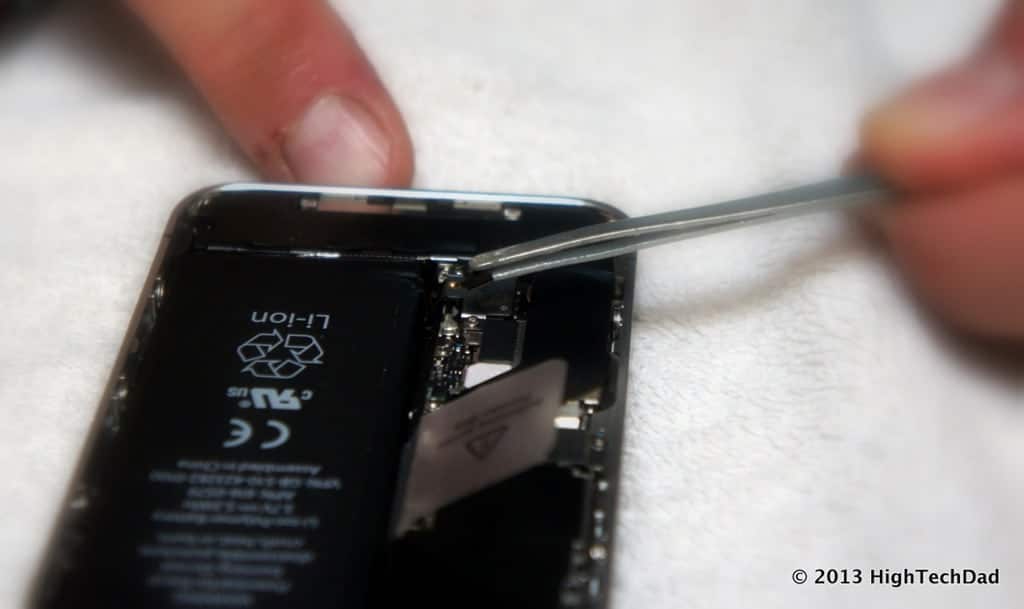
Step 6 – Pop out the pressure contact
Using the plastic or metal spudger (removal tool), carefully pry up the pressure contact. (Again, watch for that little black grounding clip!)
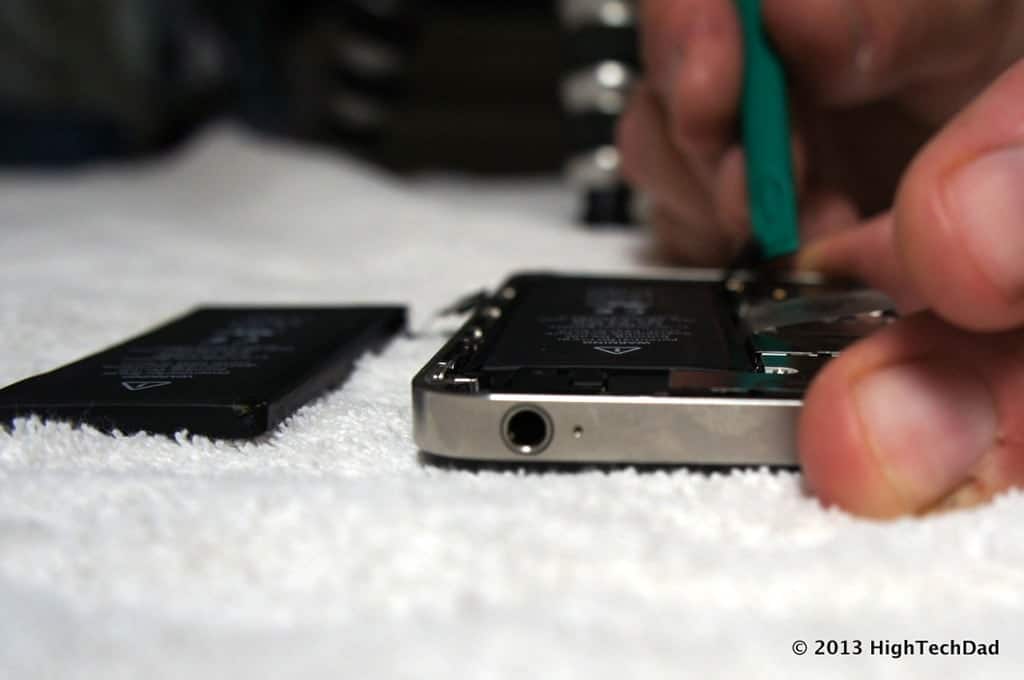
Step 7 – Pry out the old battery
This next step does take a little bit of effort. The batteries are anchored to the iPhone body via some very strong adhesive. You can either use the plastic removal tool (which I managed to break in my video) or a metal spudger, to CAREFULLY pry up the battery from both sides. You will hear some popping as the adhesive lets go. Once it has been loosened, you can use the little plastic tab to pop the battery out.
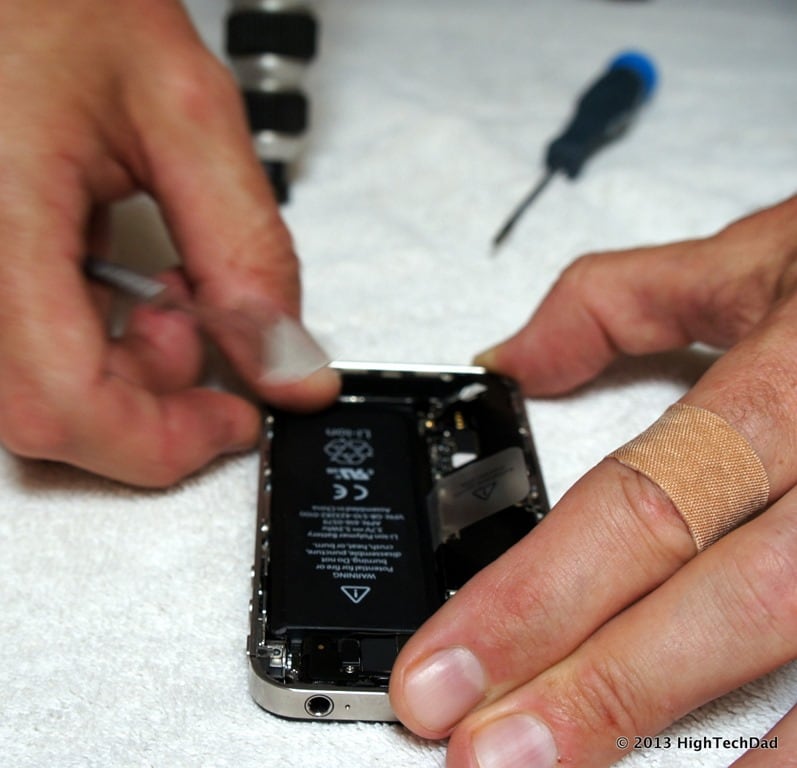
Step 8 – Install the replacement battery
Once you get the battery out (and be sure to recycle it – save the environment), you can put in the replacement battery. Simply put it back into the space and press down to re-adhere it to the base. (I always like how the iFixit guide stops at this point – they just say “To reassemble your device, follow these instructions in reverse order.”) That being said, you can do this all in reverse. BUT, if you popped out the black grounding clip, read on.
Step 9 – (Optional) Put back the grounding clip properly
If you were lucky like me, you probably dislodged the black grounding clip as you were trying to screw in some of the screws into the pressure contact. Watch the video above to see how to put it back in properly.
Step 10 – Put the back case back on & power up your iPhone
Slide the back case back on by pressing and sliding down. Then put the remaining screws into the bottom of the iPhone 4S. Cross your fingers and press the power button. If all has gone according to plan, your iPhone will power up! Just be sure to fully charge your new battery and enjoy the (hopefully) longer battery life!
Special thanks to my daughter for taking the great photos as I went through the process and to iFixit for the parts and great guides!
Disclosure Text : I have a material connection because I received a gift or sample of a product for consideration in preparing to write this content. I was/am not expected to return this item or gift after my review period. All opinions within this article are my own. More information can be found in my About page as well as here.
HTD says: See? Installing a replacement iPhone 4S battery isn’t that hard!


16 comments
Nathan Brazil
I never saw the grounding finger that’s under the outward looking camera (I think outward) until I saw a picture of it during the reassemble process…it’s a used iphone with some miles on it…but I am prone to forget-brainfade or getting sidetracked etc. So I may have put it somewhere and thought to myself “I’ll remember putting it here for sure!” but I have no memory of the darn thing.
Do you have any idea where I might find one of these stupid oddly shaped bit of metal? Or advise as to where I might try looking?
I had a hell of a time replacing the 2 speaker assembly screws I lost, but didn’t end up losing. But my need for glasses is beside the point…which was it was tougher than I thought it would be to find a couple of screws. And since I was already here learning how the clip under the battery connector was orientated + situated (ThankYou for that!) I thought I’d ask ya about this elusive grounding finger and where I might hunt one down. Doesn’t sound like something that would come with a new outward looking camera purchase. That would make too much sense.
If you don’t have any info, or do but want to keep this bit of info a ‘professional secret’…No worries.
Push comes to shove, I may be forced to ‘borrow’ this part from my mom’s 4s.
She’ll never know. :-) jk
Thanks- Mike
p.s. Great site!
JES
Just did this for my daughters (formerly mother in laws) 4s. Worked great. I wore latex gloves to avoid getting oil from my hands on the components which can create problems. Thanks for posting.
Jo.-
Great video. I love my 4S and hate the eventuality that I migt have to go to a newer model but with your video I feel confident that I can just purchase a new, replacement battery and just replace it. I went to our local AT&T store and they said go to a kiosk at the mall for $80.00 they could replace it. Then I looked at Amazon and I can get one for me and my husband for less then $30.00. Is there just one size/type battery?
Thank you!
hightechdad
Sometimes iPhones can be a bit picky on the type of batteries they take. I installed a battery on one and it kept crashing until I changed to a battery with different firmware. Be careful and buy from someone reputable.
Jo.-
Hi I did everything you mentioned in your video and put everything back together. It took a bit of time for it to power up but all I get is a slow flashing apple logo. At one point it asked for me to connect it iTunes and when I did that it doesn’t recognize the iPhone at all. It only had my iPad listed.
HELP PLEASE!!! Me without a phone is a very bad thing since I have my WHOLES life in it. I don’t even know my in laws phone number without it (and were married 25 years:-(
Jo.-
hightechdad
As part of any repair, you need to make sure that you have a full backup of your device. I write that and talk about that frequently. That way, should something go wrong on a DIY repair, you can always restore your device to a new device.
There are ways to do a restore that are documented throughout Apple’s site and on countless other sites.
Did you buy the battery from a reputable source? If you only paid a tiny amount for the battery, chances are it has issues. Some people have had success with it.
When the iPhone asks you to connect to iTunes, most likely, it is in recovery mode. You are then asked if you want to restore from a previous backup. If you had done a backup prior to your repairs, you would have seen your device’s backup in a dropdown within the restore screen.
Sorry if you are encountering issues and best of luck.
JD
Thank you for the tutorial. After replacing the battery, I powered it up and the battery was on 67%. I charged it for about 5 minutes because I had to go out somewhere, and it kept shutting off, even at 70%. Do I have to charge it to 100% and/or for a longer amount of time? Or do you think I made an installation error? I know my iphone 4s is ancient, but I’m attached to it and do not want to shell out the $$$ for the newer iphone 5 or 6. Any serious advice would be great!
hightechdad
Did you buy the battery from a reputable source? There are some on eBay or other sites that are knock-offs so they may not work as well as ones that are a bit more expensive.
JD
Yes, I bought the battery on Amazon.com. It had the best reviews out of all of them. So far, the phone hasn’t powered off. I left it charging overnight. What I experienced was not normal though, was it?
hightechdad
Normally, there should be a little bit of a charge. One thing you may want to try is to do a full backup of your iPhone and then do a full restore from that backup. That has been known to fix some issues.
JD
OK- will try that restore. This afternoon, my phone shut off again at 50%. I disassembled it and reinstalled the battery, checking all the connections. While the battery was out, I checked the manufacturing date, and it was 7/12. I have contacted the seller about this.
Baker
Hello,
I just finished you tutorial on changing the battery of my Iphone 4s, now how ever I can’t get a signal on the phone. It only searches for the signal all the time and also the clock can not adjust automatically got any suggestion?
Thanks very much
hightechdad
Sounds to me that you didn’t connect one of the ribbons or damaged something in the process. I would carefully take it apart again and double check for damage or for not connected cables/ribbons. Good luck!
baker
It did not work, thanks any way
Thingius
hello, i would like to ask some questions about the battery change! Have you found what the little black (grounding) thingy is about? I changed my battery but i lost the upper screw (that hold the black thing with the battery connector) so i used the screw from the bottom to hold it together! Doing that i left the bottom side of the connector unscrewed as I didn’t have any other screws! Now my 4s’s signal is quite weaker! Do you think that not screwing both screws may be the reason of that? Is the upper screw made from some other material that is making the signal stronger? or are both screws needed to have a stronger signal? Thank you very much!
hightechdad
The black clip definitely helps with connectivity. The screw that you used to replace it might not have the conductive capabilities as the one that was on it previously. Also, if you put the clip in wrong, that could affect things.